Learn how to use our easy book cover design templates in AdobePhotoshop, with text, diagrams and screenshots along with a step-by-step video guide
Designing your own book cover as an independent, self-publishing author can be both exciting and daunting. Your cover is super-important. After all, it's the first impression potential readers have of your book, and it can make all the difference in attracting attention and inspiring someone to pick it up and look inside.
By the end of this post, you should have a really solid understanding of how to create a cover using a QinPrinting book cover template in Photoshop; and one that meets the technical requirements for printing and is indistinguishable from a professional design.
What are the advantages of pre-made book cover templates?
Using pre-made book cover templates provides several key advantages, especially for independent authors like you who may not have extensive design experience. All our templates are pre-formatted with all the necessary technical details, such as bleed lines, trim lines, and safety zones, which help to guarantee that your cover will be printed accurately and professionally. This is particularly important for newbie designers because even a small error in the layout can lead to significant problems during the printing process, such as cut-off text, misaligned images, or poorly centered spines.
Now that we've looked into why using a pre-made cover template is beneficial, let's go through the step-by-step process of downloading and customizing your template from QinPrinting and creating your cover with it, using Adobe Photoshop.
Step-by-step guide to using a pre-made book cover template in Adobe Photoshop
We recommend strongly that you watch the instructional video at the top of this page before you go any further. It'll really help you to understand the following text instructions and visualize more clearly what you need to do.So, assuming you've watched the video, let's move on.
1. Download your design template
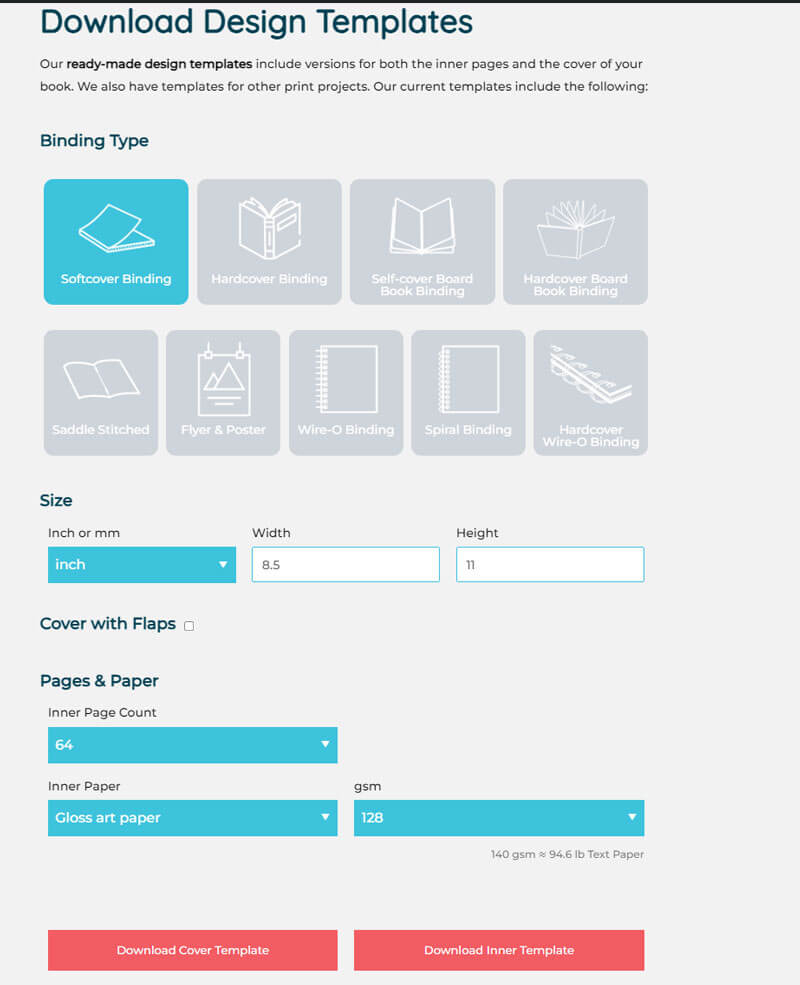
To begin, you'll need to download a design template that matches your book's format and specifications—and you can customize it with a few simple clicks to make sure it does. Go to QinPrinting cover templates where you'll find a variety of pre-made templates for different binding styles, including softcover, hardcover, and saddle stitch, among others.
- Choose the binding style that suits your project, whether it's a novel, children's book, graphic novel, or something else.
- Fill in the necessary details, such as the dimensions of your book, paper choices, and other relevant specifications.
- Once you've completed the form, click on the “Download cover template” button.
- Save the template for your computer.
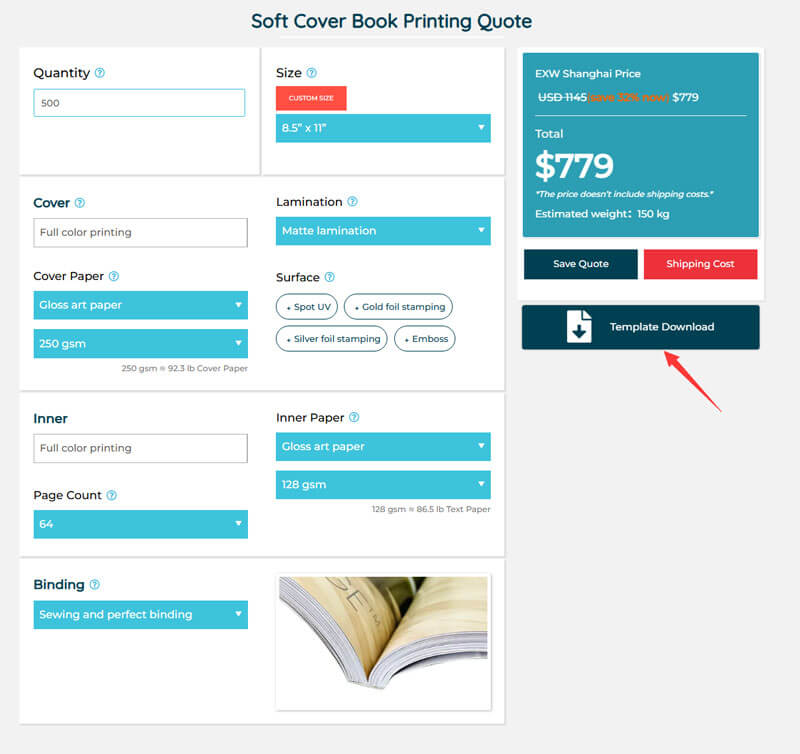
We provide the templates in PDF format, which is ideal for working with any of the Adobe Creative Suite apps, including Photoshop, and it's also the optimal export format for printing. The first page of each template includes helpful guidelines, such as the dimensions of your book and visual indicators for the bleed lines, trim lines, and spine area. This may not look like much at first glance, but take time to understand it; it's vital information essential to making sure your design fits the final product perfectly.
2. Open the template in Adobe Photoshop
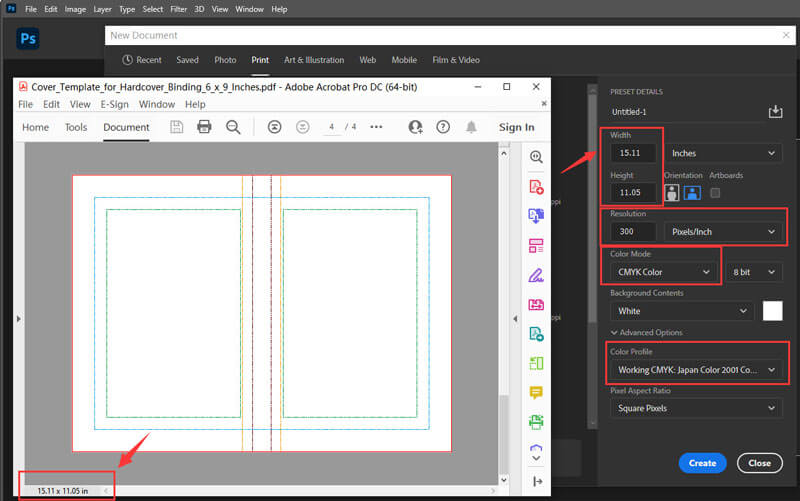
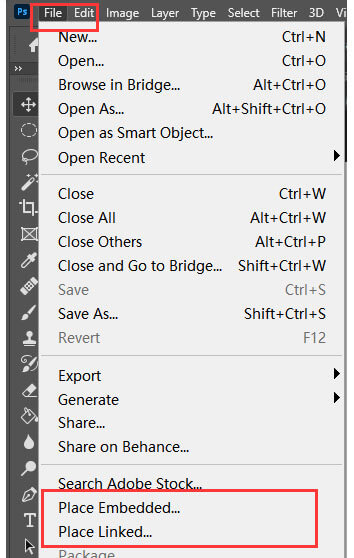
Once you've downloaded the template, open the PDF file in Adobe Photoshop. The last page of the PDF typically contains the blank template that you will use to create your design. Take note of the dimensions of this page, as you'll need them to set up your workspace in Photoshop.
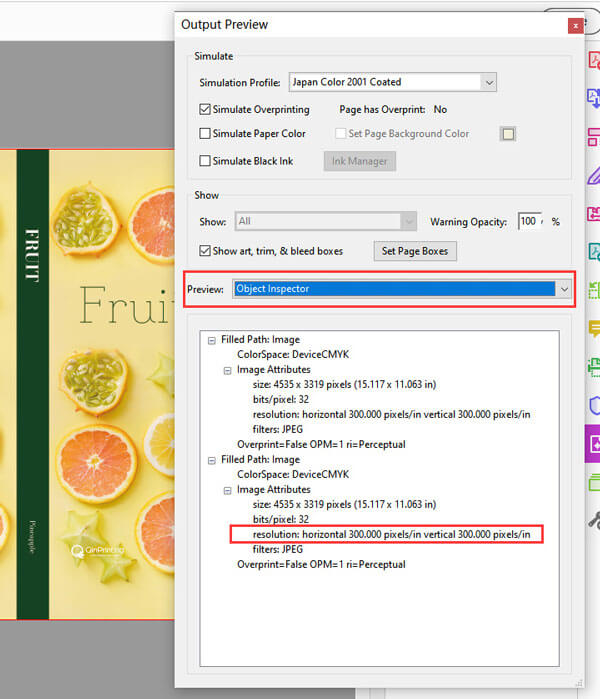
In Adobe Photoshop, select “Create New” to start a new project. Input the dimensions of the template page you noted earlier. For the best print quality, use must a resolution of at least 300 dpi (dots-per-inch), set the color mode to “CMYK Color,” and choose “Japan Color 2001 Coated” as the color profile. These settings will help to guarantee that your design is optimized for high-quality printing.
3. Understand the template layout
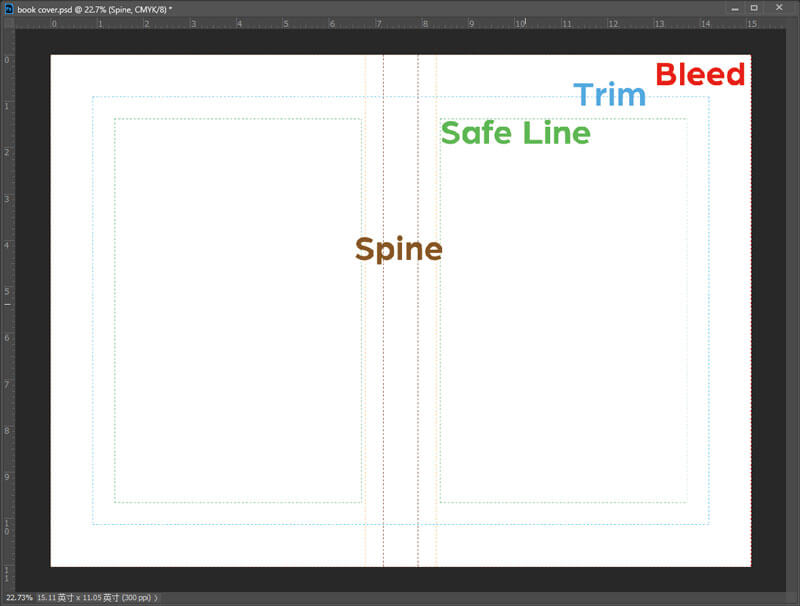
When your workspace is set up, you'll see the guidelines on the template. These lines are color-coded for easy reference:
- Red lines indicate the bleed area. Your background images and any design elements that extend to the edge of the cover should reach these lines to avoid any unwanted white borders after trimming.
- Blue lines mark the trim area. This is where your book will be cut during the printing process.
- Green lines show the safety zone. Any important content, such as text or logos, should stay within this area to make certain nothing gets cut off during printing.
- Spine, which are essential for aligning the front, back, and spine elements of your design.
4. Lock the template layer
Before you begin designing, lock the template layer in Photoshop. This prevents you from accidentally moving or altering the guidelines while you work. You can then create new layers for your design elements, keeping everything organized and editable.
5. Start designing your cover
- Think about color (what colors? Contrasting? Complementary? How many?)
- Text (which fonts? How many? Author name position and size, title, strapline, etc.)
- Composition (the way the various elements fit together)
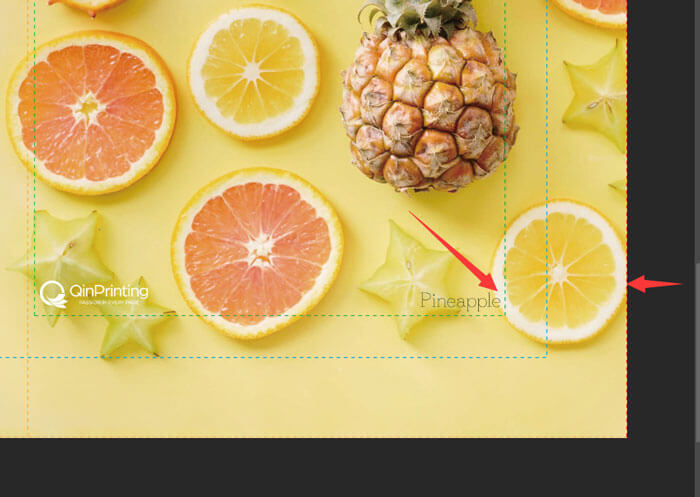
6. Hide the template layer
Once you're satisfied with your design, click to hide the template layer. This will allow you to preview your cover without the guidelines before finalizing your work.
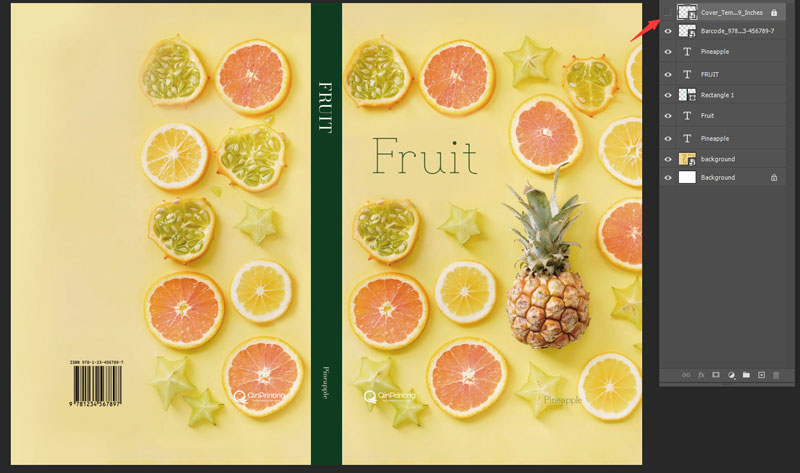
7. Save your design as a PDF
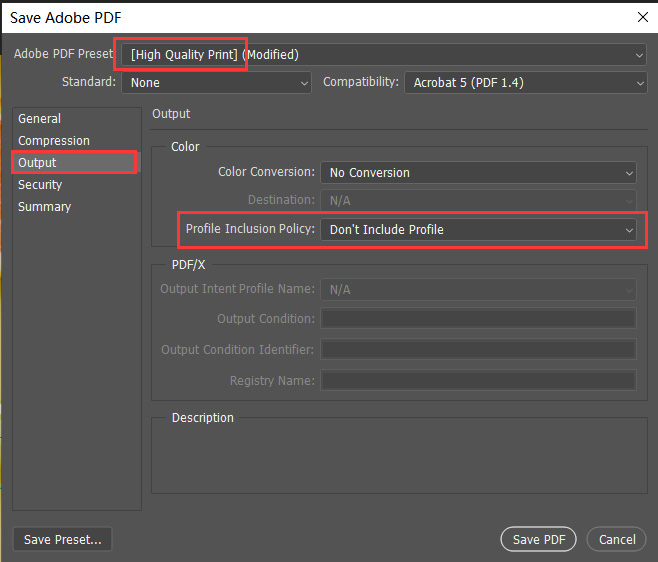
When your design is complete, then you can save it for printing. Select “Save As” and choose “Photoshop PDF” as the file format. In the settings panel, opt for “High Quality Print” to make certain that your design will look sharp and professional. Under the output options, select “Don't Include Profiles” to avoid any issues with color management during printing.
8. Check your PDF for errors
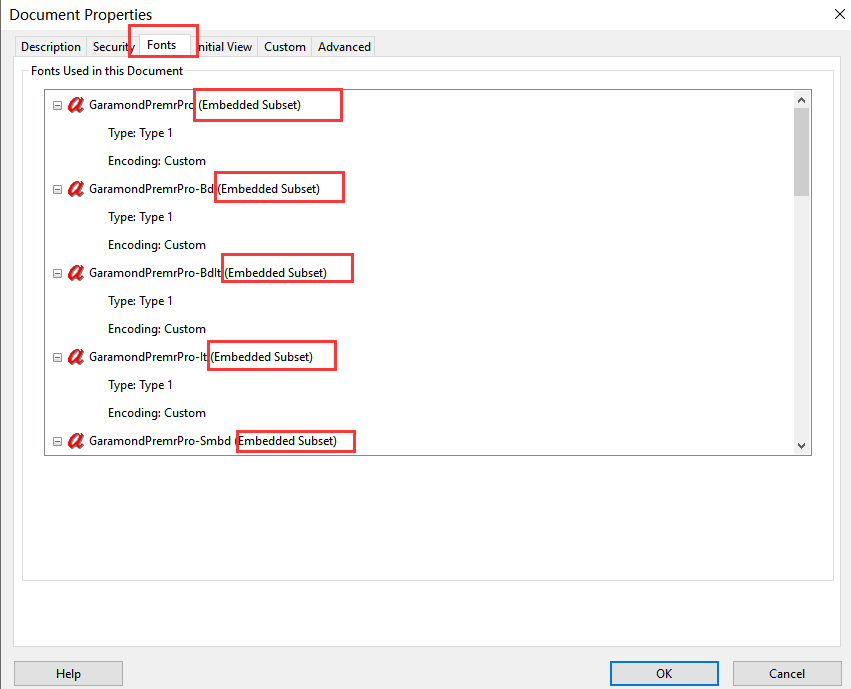
This is a vital step, especially if it's the first time you've designed a book cover. Before sending your design off to us for printing, make sure to check for any potential errors. Open the saved PDF in Adobe and go to “File” – “Properties.” Under the “Fonts” tab, make sure all fonts have the “Embedded Subset” symbol, which guarantees that your fonts will be correctly displayed during printing.
Let's talk! We're here to help you.
Creating your own book cover using one of our customizable pre-made templates in Adobe Photoshop can be a a great way to learn the basics of book cover design as well as a fun and rewarding experience. Not only does it allow you to have full creative control over your book's appearance, but it also helps you produce a professional-quality product without needing advanced design skills. Although remember what we said about researching professional covers that you like to learn about what elements make up a great design and how to put them together. Whether you're designing a cover for a romance, crime, science fiction, fantasy, or literary novel, a children's picture book, a comic, or even a coffee-table book filled with art reproductions or photos and essays or other images and text, our pre-made templates offer the best balance between ease of use and flexibility.
By following the simple steps that we've given you in this post and studying the diagrams, screenshots, and video, you'll be well on your way to creating a stunning, print-ready book cover of which you can be really proud The right cover design can make a lasting impact on your readers and help your book stand out on the shelf, both in physical stores and online. So, take the time to experiment with different design elements, colors, and fonts, do plenty of research before you start, get advice when you need it, and don't be shy of getting in touch with us if you need more help.
Shoot us an email to [email protected] or call us at +1 951 866 3971 and we'll be delighted to discuss your needs.


