At QinPrinting, we recommend you use Adobe InDesign to create your print book layouts. We think it's the best. It's also what we use, so if you use it, too, it will streamline the process from project to print.
Adobe InDesign has revolutionized the realm of book layout and design, offering a powerhouse of tools ranging from master pages to text wrap, and enhanced paragraph styles. Recognized widely as a premier desktop publishing and typesetting software, it supports the creation of diverse materials such as posters, brochures, magazines, and notably, hardcover and paperback printed books, making it a go-to solution for aspiring authors and self-publishers. The intricacies of book design, including typography, margins, and all the other critical aspects of a book interior design, are pivotal elements that Adobe InDesign handles adeptly, making sure your book layout stands out and offers the best reading experience.
In this post, we'd like to help you prepare your book for printing by giving you a comprehensive Adobe InDesign tutorial that not only stresses the importance of a well-thought interior layout but also guides you through the essential steps of manuscript preparation. It's imperative to have your manuscript fully edited and primed with character and paragraph styles as well as the front and back matter sections before diving into the practicalities of page layouts, text alignment, grid layout, and typography. In this guide, we'll navigate you through the full spectrum of book design essentials including, but not limited to, typesetting, gutter margins, trim size, bleed, and more. Ready? Let's go!
Table of Contents
Add a header to begin generating the table of contents
Understanding InDesign's interface
Navigating Adobe InDesign's interface efficiently is pivotal for mastering book layout. When you first open InDesign, you're greeted by the Home screen, which is your gateway to the software's extensive capabilities. Here's a quick rundown of what you'll find:
Tabs and buttons: These are essential for creating new files, opening existing projects, accessing helpful tutorials, and reviewing recently modified files. This makes sure that your most important work is always just a click away.
Workspace layout: InDesign's workspace is thoughtfully designed to enhance your productivity.
Workspace overview
The Application Frame and Application Bar, which provide structure and quick access to commonly used tools.
The Tools Panel, which houses all the tools you'll need for creating and editing your book layout.
The Control Panel, offering contextual options and commands depending on the selected object, making it easier to make precise adjustments.
Document Window and Panels, the main area where your book layout comes to life, supported by panels that offer additional functionality and settings.
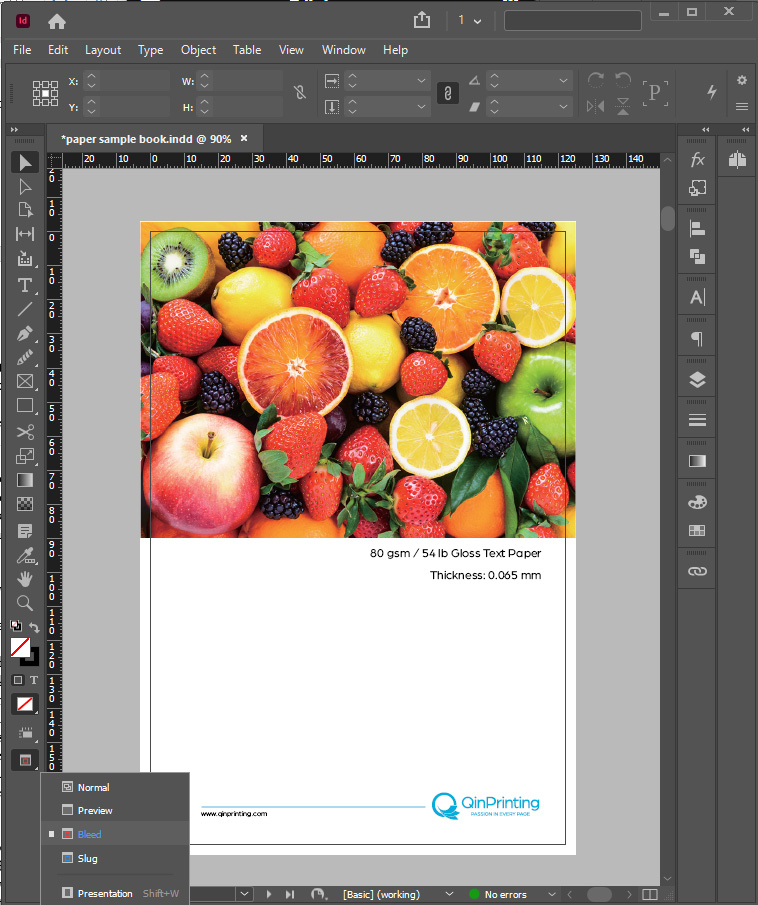
Screen Modes
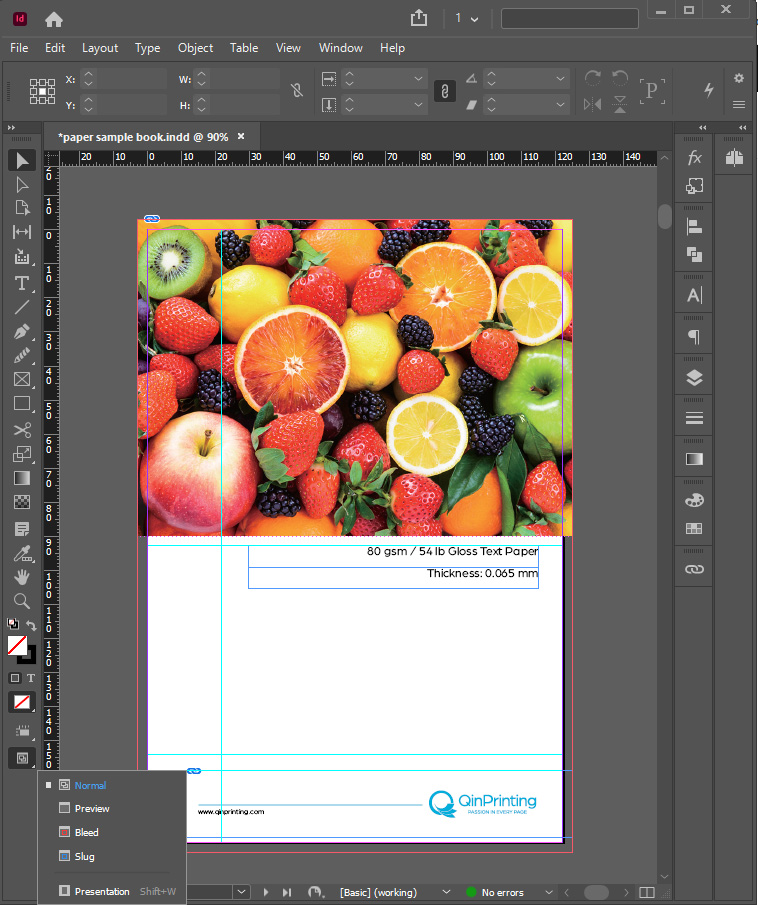
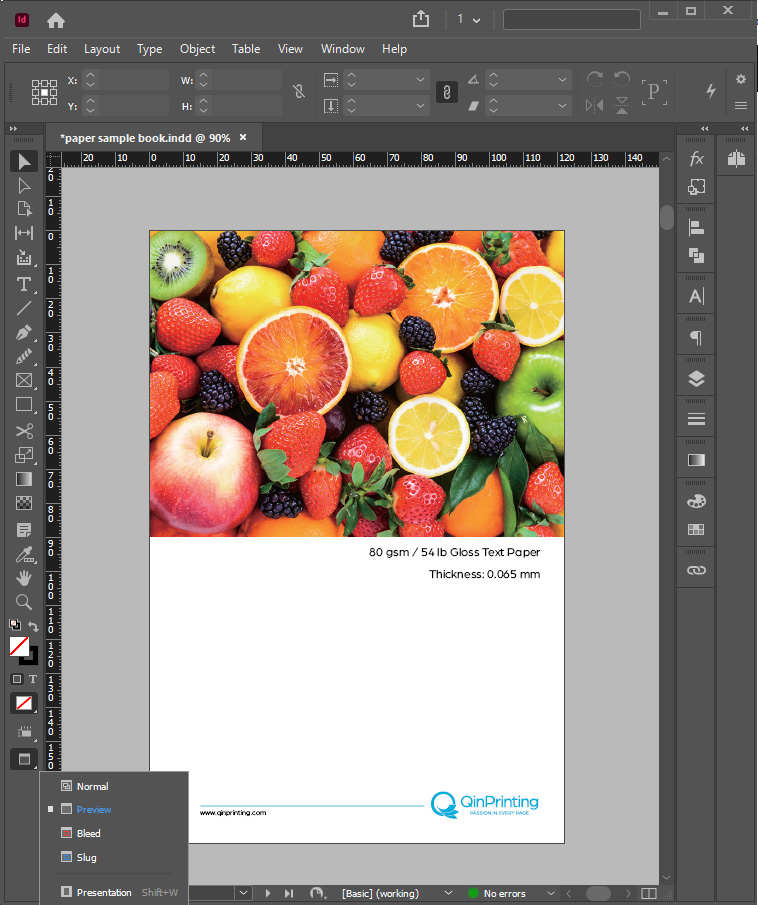
Understanding the different Screen Modes can significantly impact how you view your work. InDesign offers several modes such as Normal, Preview, Bleed, Slug, and Presentation. Each mode serves a specific purpose, from editing to presenting your layout in a more polished view, making it vital to familiarize yourself with these options for a smoother workflow.
Normal View
Preview View
Bleed View
Customization
Customization is key to a streamlined workflow in InDesign. The software allows you to tailor your working environment to suit your preferences and project needs. Here are some adjustments you can make for an optimal experience:
Interface preferences: Adjust the color theme, match the pasteboard to the theme color, and specify preferences like showing tool tips, enabling multi-touch gestures, and setting large tabs for easier navigation.
Workspace customization: You have the freedom to arrange and save your workspace layout, set your preferences, and use default keyboard shortcuts to speed up your design process.
By familiarizing yourself with these aspects of InDesign's interface at the outset, you're setting the stage for a more efficient and enjoyable book design experience. Remember, the more comfortable you are with the software's environment, the more creative and productive you can be in bringing your book layout to life. Book design is complex and time-consuming, so the more thoroughly you prepare before you get started, the more enjoyable and successful your experience will be. And your book will be better, too!
How to set up your InDesign document
Before diving into the intricacies of Adobe InDesign for your book layout, it's important to set up your document correctly. This foundation will significantly influence the ease of your design process and the quality of your final product. Here's how to get started:
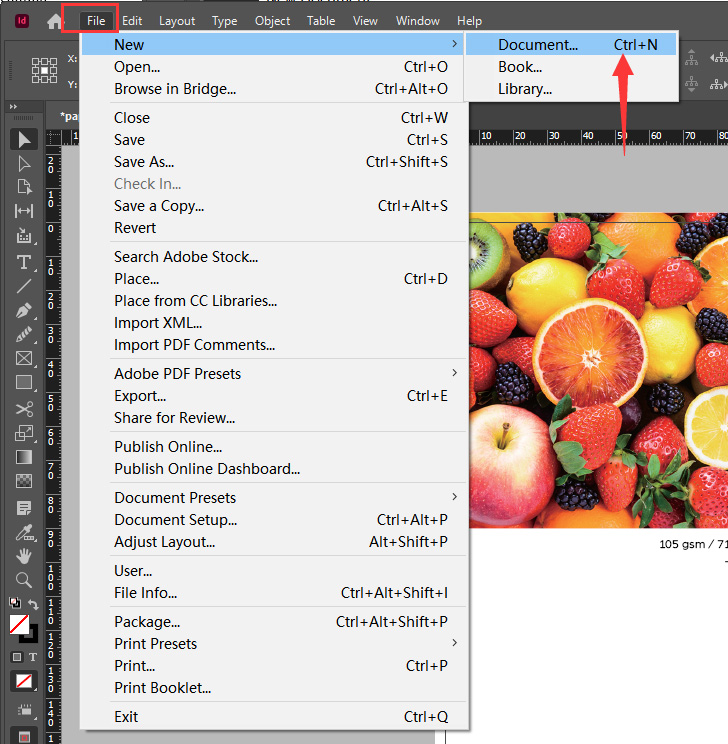
Creating a new document:
1. Navigate to ‘File' > ‘New Document'.
2. Choose your project type: Select ‘Print' as you're designing what will be a physical book.
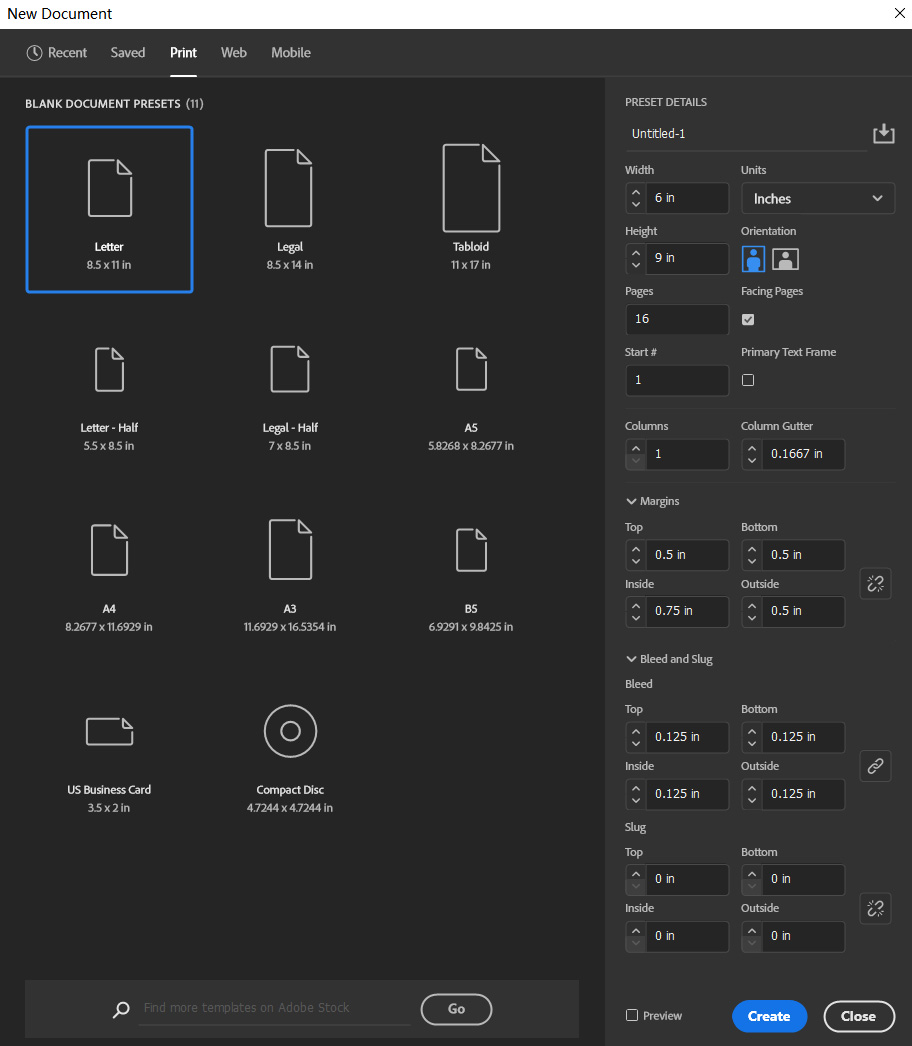
3. Specify your document's details:
Page size: Choose from standard sizes or enter custom dimensions. For example, a typical novel may have a trim size of 6" x 9".
Orientation: This will be portrait for most books. However, for an art or photography book, for example, you might want to select landscape.
Facing pages: Check this if your book will have a two-page spread, common in coffee-table books, for example, some children's books, art books, and textbooks.
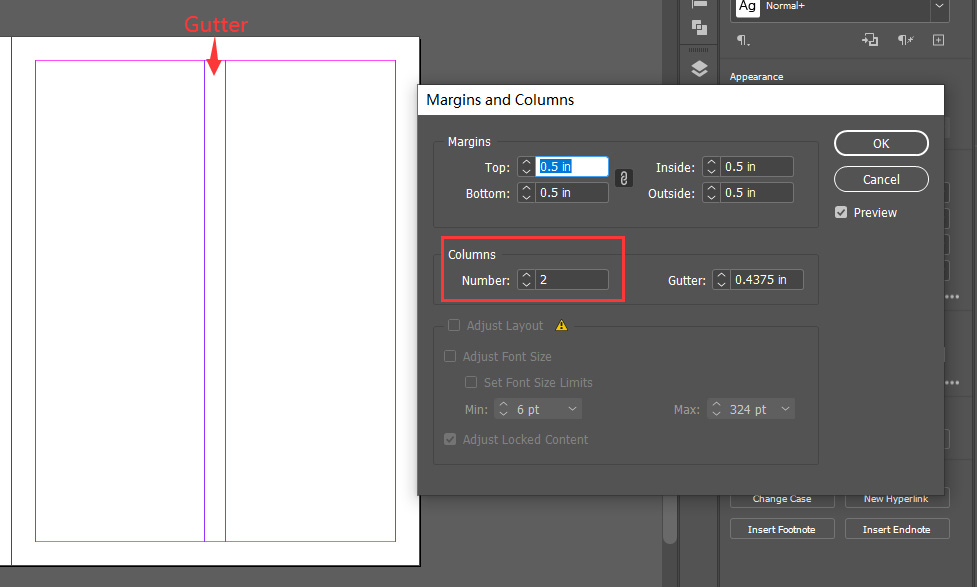
Columns and gutter: Adjust based on your layout preference. The gutter is the space between columns. If your book doesn't have columns, you needn't worry about this. Although, you'll still need to account for the bind side gutter. But we'll explain that in detail later.
Margins: Set generous margins to make sure text isn't cut off during printing; typically, at least 0.125"(3mm).
Bleed and slug: Add a bleed of typically 0.125" (3 mm) if your design will extend to the edge of the page. The slug area is for printing marks and not essential for most book projects. If you're not sure what this means, don't worry, we'll explain everything in a minute.
Adjusting document settings
Once you have your document, you may want to check and adjust your settings. These are the essential settings to manage:
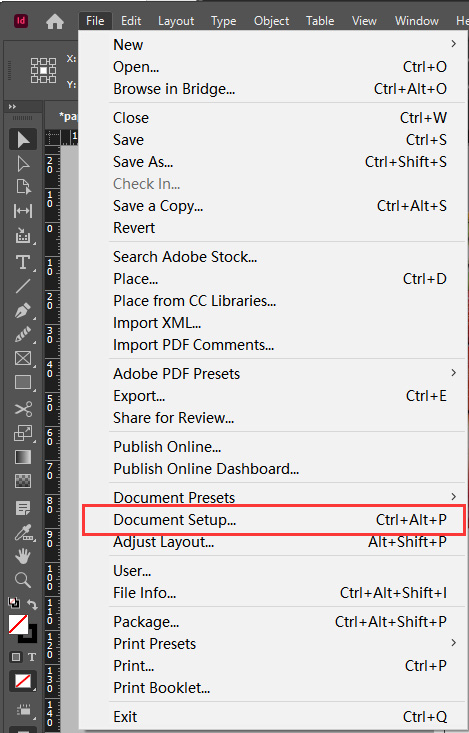
Bleed settings: Accessible via ‘File' > ‘Document Setup'. Enter your bleed values here to make sure colors and images extend beyond the trim line.
Master pages: Double-click on the ‘Master Page' in the ‘Pages' panel to apply consistent headers, footers, or backgrounds across your book.
Units and increments: InDesign defaults to picas, but you can switch to inches or millimeters by going to ‘Edit' > ‘Preferences' > ‘Units & Increments'.
Saving and modifying your document
Once you've set up your basic document, you'll need to save it. You'll also need to know how to come back and adjust settings later, should you need to. Here's what you need to know:
After setting up your document, save it by choosing ‘File' > ‘Save'. Decide on a memorable name and location for ease of access.
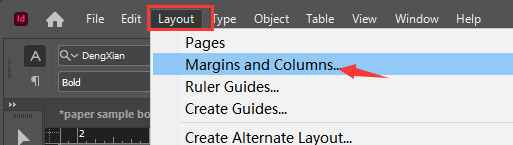
Should you need to adjust your document settings later, you can do so in the ‘Document Setup' under the ‘File' or ‘Margins and Columns' under the ‘Layout' menu.
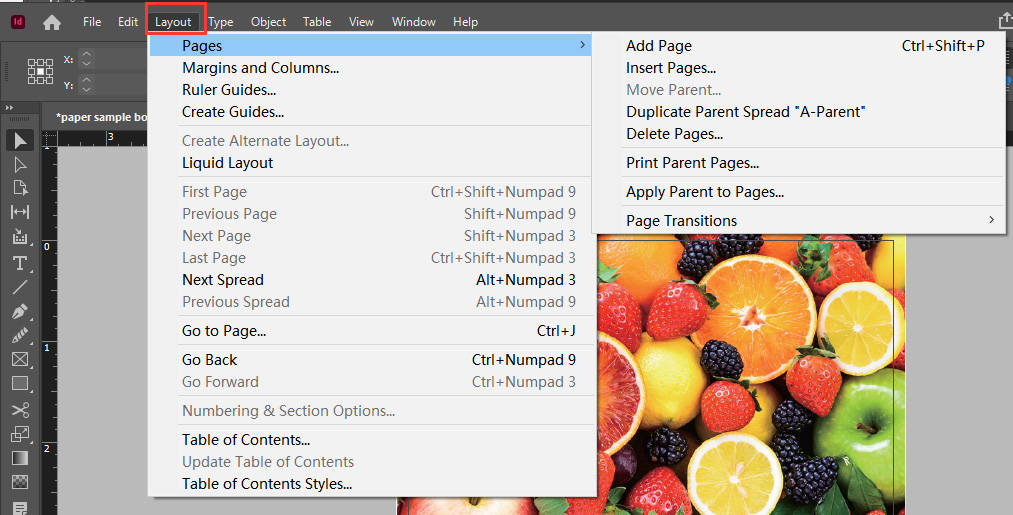
To add new pages or adjust the facing pages setting, navigate to ‘Layout' > ‘Pages'. Here, you can also switch between single pages and spreads if your project's needs change.
Remember, a well-configured document setup is the first step towards a professional and polished book layout. Taking the time to get this foundation right will streamline your design process, making it more efficient and enjoyable and helping to guarantee a slick, professional result.
Working with Master Pages
Master Pages, often referred to as Parent Pages in Adobe InDesign, are the backbone of efficient book layout, allowing you to apply a consistent look across multiple pages or even entire sections of your book. Here's how to leverage Master Pages for your book layout:
Creating and applying Master Pages
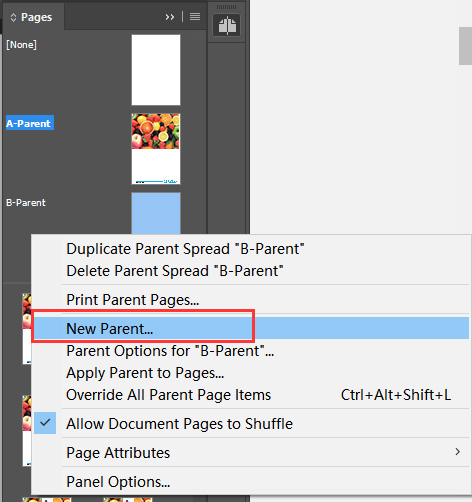
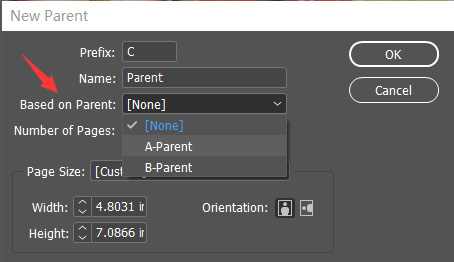
1. To create a new Master Page: Go to the Pages panel, click on the menu icon, and select ‘New Master.' This will prompt you to specify options such as the size and name of the Master Page. Remember, Master Pages can contain multiple layers, making it easier to organize elements like headers, footers, and page numbers.
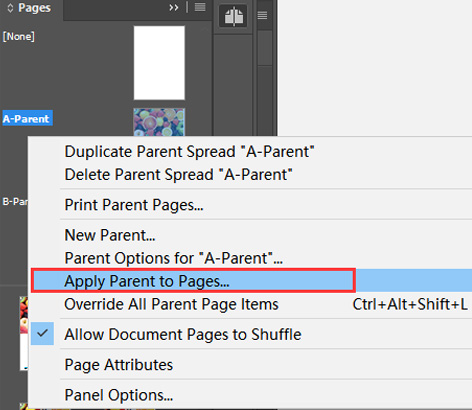
2. Applying a Master Page: You can apply a Master Page to a document page or spread by dragging the Master Page icon to a page icon in the Pages panel. Alternatively, right-click on the desired page(s) and select ‘Apply Master to Pages.' This is especially useful for adding consistent elements across your book, such as page numbers or a recurring footer.
Customizing Master Pages
1. Overriding Master Page items: To customize specific pages without altering the Master Page, hold Control-Shift (PC) or Command-Shift (Mac) and click on the element you wish to override. This action creates a dotted border around the item, indicating it can be edited independently of the Master Page.
2. Override all master page items: Select one or more page thumbnails in the Pages panel, right-click and choose ‘Override All Master Page Items'.
3. Cascading Master Pages: For complex layouts, you can base one Master Page on another. This technique is invaluable when you want consistent layouts across different sections with slight variations, such as chapter headers or unique background designs.
Advanced Master Page techniques
Once you've got the hang of Master Pages, you may want to take advantage of the following more advanced techniques which can speed up a few basic processes:
Page numbering and section markers: To add page numbers, double-click on the Master Page where you want the numbers to appear and insert a text frame. Use the Type menu to insert a Special Character for the Current Page Number. For documents with facing pages, make sure to separate text frames for left and right pages.
Using layers for enhanced control: Layers on Master Pages offer a powerful way to manage the visibility and order of elements. This is particularly useful for complex layouts where elements need to appear above or below others consistently across the book.
Chapter differentiation: Duplicate Master Pages for each chapter to experiment with different layout designs or to maintain a unique style across various sections of your book. This approach allows for creative flexibility while keeping the overall design cohesive.
By mastering these techniques, you'll be able to create a professional and polished book layout using Adobe InDesign, making sure your book's design is as compelling as its content. Talking of content, now you've set up your pages, it's time to import and format your text.
Importing and formatting text
When working with text in Adobe InDesign for your book layout, it's essential to start with a clean and well-prepared manuscript. This leads to a smoother process when importing and formatting text within your document. Here are the key steps and best practices for handling text in InDesign:
Preparing your text for import
Whether you've been working with Word or some other word processor to write your text, while it may look clean and ready to go, it's probably riddled with orphaned formatting elements and hidden code generated while writing, rewriting, and editing. So, here's how to get your document ready to import into InDesign;
Clean up your manuscript: Before importing, check that your text is free of extra returns, manual tabs, and that blank pages are truly blank. This step is essential for avoiding formatting issues later on.
Use a consistent Word template: If you're writing your original in Word, then use a standardized Word template. This helps guarantee that when your text is imported, it maintains a level of consistency, especially in terms of styling and formatting.
Importing text into InDesign
Now you have a clean document, let's look at how to import it into InDesign so you can start working on your layout.
Methods of inserting text: You can add text to your InDesign document by typing directly, copying and pasting, or importing from a word-processing application. The latter is best for long documents as it keeps the original formatting.
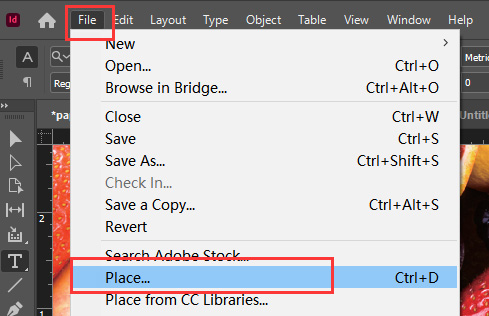
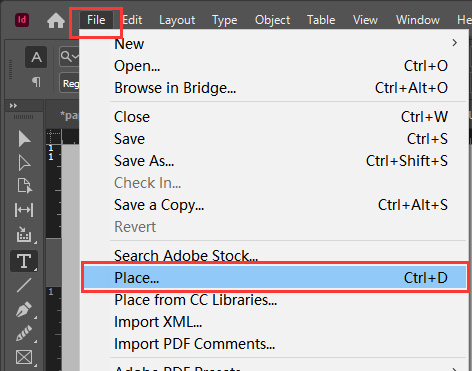
Using the Place function: To import text from a Word document, navigate to ‘File' > ‘Place', select your document, and make sure the ‘Show Import Options' box is checked to customize your import settings.
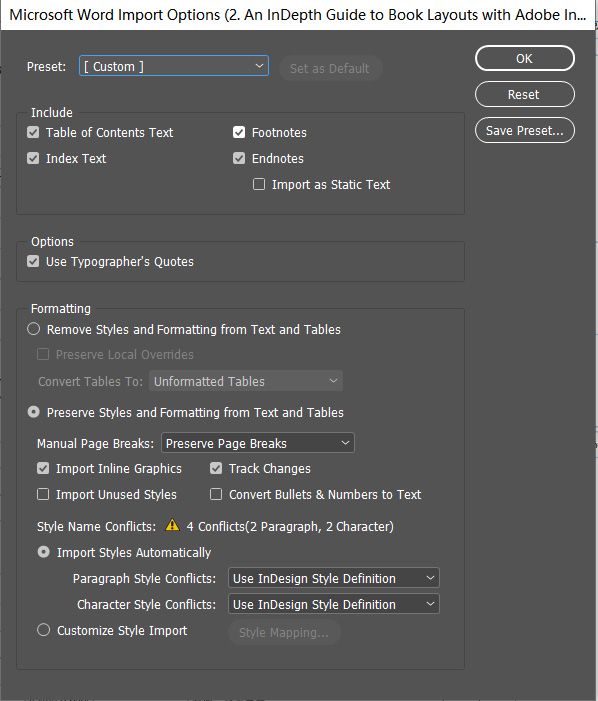
You have several options for handling the formatting on importing your document. Which you choose depends on your specific project needs. But here are your options:
Without formatting: Imports text without any original styling.
Preserving formatting: Retains the formatting, which can be handy if style names in Word and InDesign match.
Customizing style import: Offers the most control by allowing you to map Word styles to specific InDesign styles but it's more complex and time-consuming.
Still, whichever option you choose, once you've imported your document, part of layout and design involves further formatting, so you have plenty of opportunities to adjust and fine tune everything from this point on. So, let's look at how to format text using InDesign after importing.
Formatting text in InDesign
These are the three core features you need to know for formatting your document in InDesign:
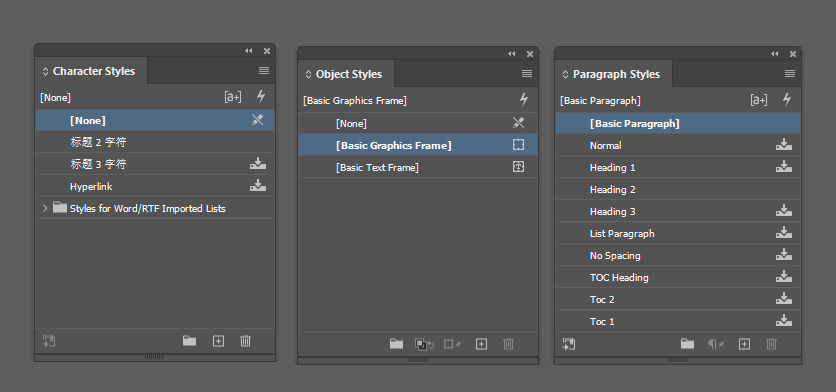
Applying styles: After importing, create blank characters and paragraph styles for formatting that needs to be retained, like italics or bold. Use InDesign's Find/Change function to apply these styles throughout the document efficiently.
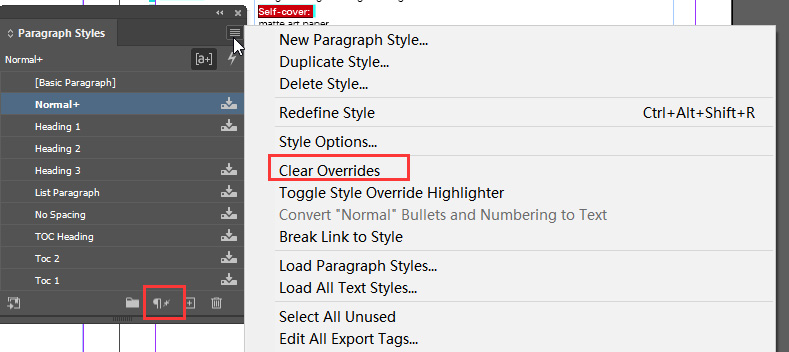
Clearing overrides: To guarantee you preserve the imported formatting correctly, use the ‘Clear Overrides' option in the Paragraph Styles or Character Styles panel. This action removes any direct formatting applied to the text, allowing the imported styles to take precedence.
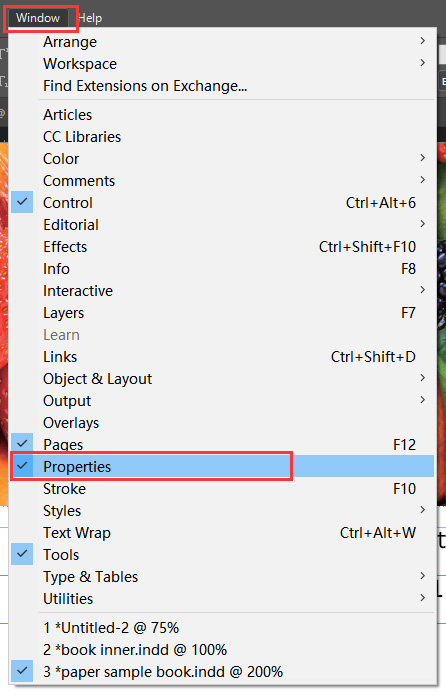
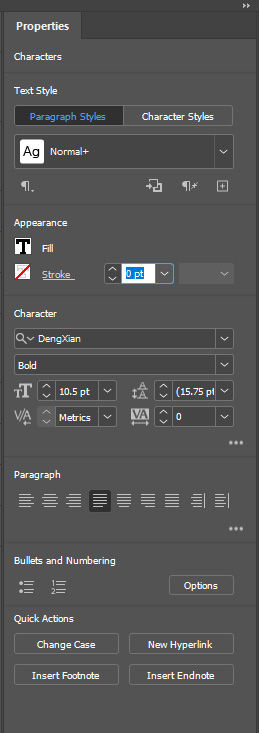
Paragraph formatting options: You can adjust text alignment, indentation, spacing, and apply styles using the Properties panel for a polished look.
Remember, you can customize the toolbar and control bar in InDesign which will change based on the selected tool and object, providing quick access to various tools and settings for text formatting. Also, activating guides from the rulers can help align text elements consistently throughout your book layout. By following these steps, you can make sure that the text in your book is beautifully formatted and contributes to a professional and engaging reader experience.
Text and typography
With book layout in Adobe InDesign, mastering text and typography is a pivotal step towards creating a visually appealing and reader-friendly book. In this section we'll explore the intricacies of typography, offering insights and practical tips to enhance your book design.
Column gutters and styles
Column gutters, vital for separating columns, play a significant role in readability. The rule of thumb is to adjust the gutter space based on the number of columns; more columns necessitate wider gutters. Novels probably won't have columns, although you'll still need to allow for the interior gutter on the binding page side, but many textbooks have multiple columns of text.
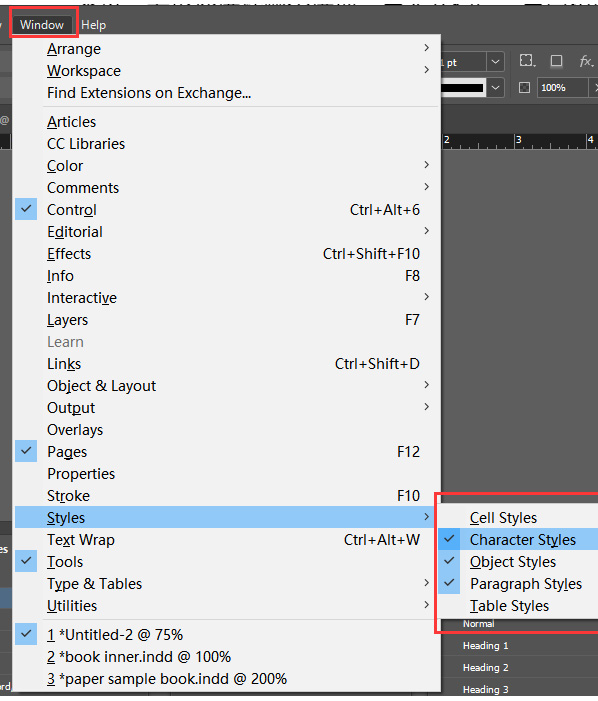
Applying styles is important. Use paragraph styles for body text, headings, and captions. Character styles are essential for specific tweaks like emphasis. Remember, every text element in your book should have a custom style for consistency.
Typography essentials
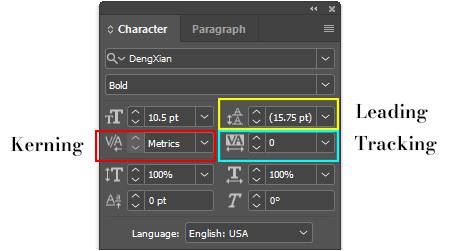
Leading/line spacing: Proper leading is non-negotiable for comfortable reading. It balances text density and fluidity, helping the words to flow seamlessly across the page.
Kerning and tracking: Adjusting kerning improves readability by refining the space between letters, while tracking adjustments can alter the overall density of text, making it tighter or more open.
Font choices: Limit your design to a few complementary fonts to maintain visual harmony. Use font-family variations to add depth without cluttering the layout. Simplify content by focusing on clear, concise communication.
Advanced typography with InDesign
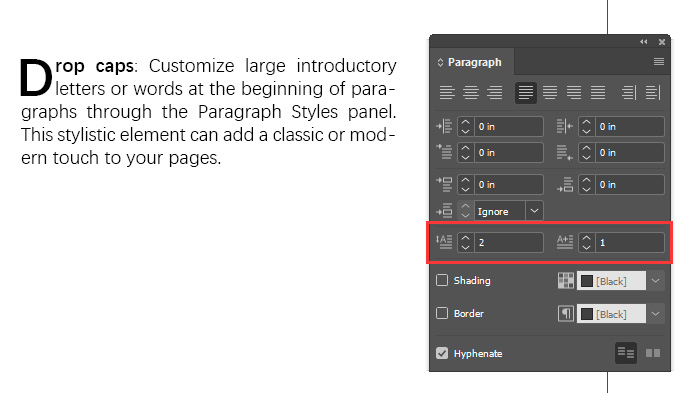
Drop caps: Customize large introductory letters or words at the beginning of paragraphs through the Paragraph Styles panel. This stylistic element can add a classic or modern touch to your pages.
Character and paragraph formatting controls: InDesign's panels offer granular control over font, weight, size, alignment, and indents, enabling you to manage precise adjustments for individual characters or larger text blocks.
Eyedropper tool: You can copy type attributes like character and paragraph settings with the Eyedropper tool and apply them to other text. Customize what attributes are copied using the Eyedropper Options dialog box for efficiency.
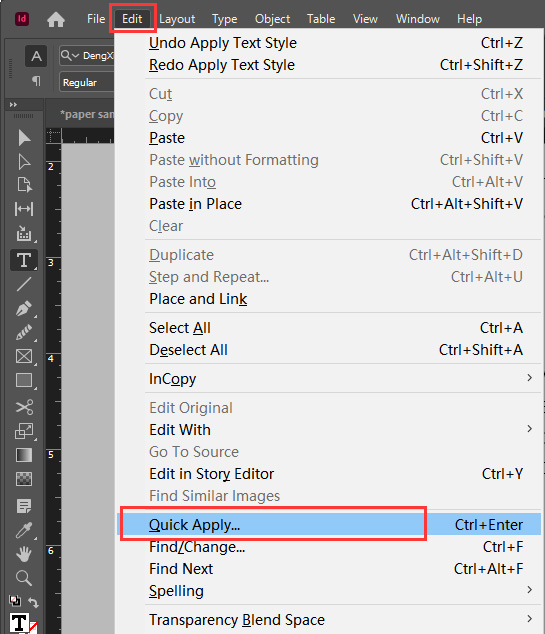
Quick apply feature: This powerful tool allows you to search and apply a range of styles, commands, and scripts, so you can streamline the formatting process and create a consistent aesthetic throughout your book.
By adhering to these guidelines and leveraging Adobe InDesign's robust typography tools, you can significantly enhance the legibility and aesthetic appeal of your book layout. Remember, typography is not just about making text readable; it's about setting the tone and mood of your book, inviting readers into the narrative through visually engaging layouts.
Creating and using paragraph and character styles
Creating and using Paragraph and Character Styles in Adobe InDesign is a fundamental skill for developing consistency and professionalism in your book layout. Here's how to effectively manage these styles:
Paragraph styles
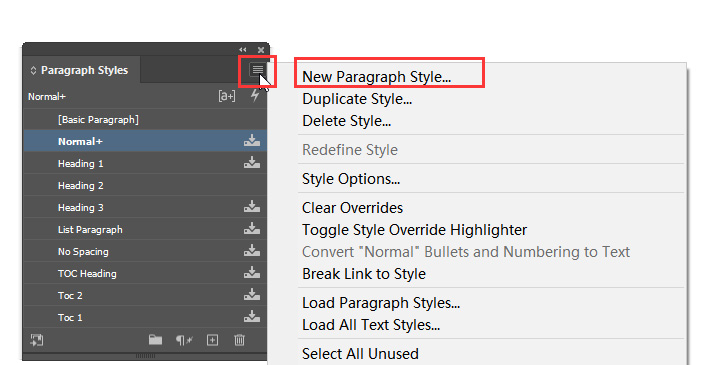
To create a new Paragraph Style, select the text you wish to format, navigate to the Paragraph Styles panel, choose New Paragraph Style, name your style, and then adjust settings like font, size, and color. You can then apply this style to any paragraph within your document. Consider adjusting settings under categories like Indents and Spacing, Paragraph Rules, and Drop Caps for more advanced formatting options.
Character styles
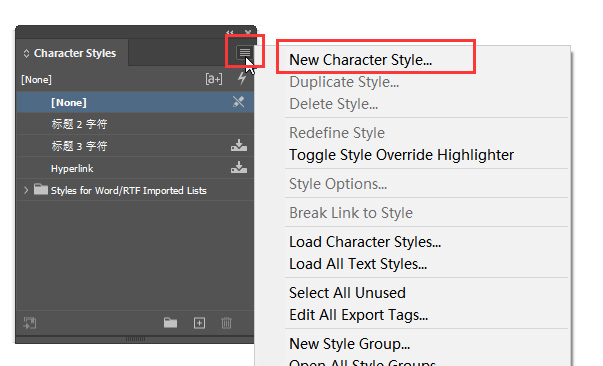
For Character Styles, highlight the specific characters, go to the Character Styles panel, select New Character Style, name it, and customize settings such as font weight and color. These styles are ideal for formatting individual characters or words within paragraphs, such as bolding or italicizing specific terms. You may want to explore options such as Underline Options or Character Color for more detailed customization.
Editing styles
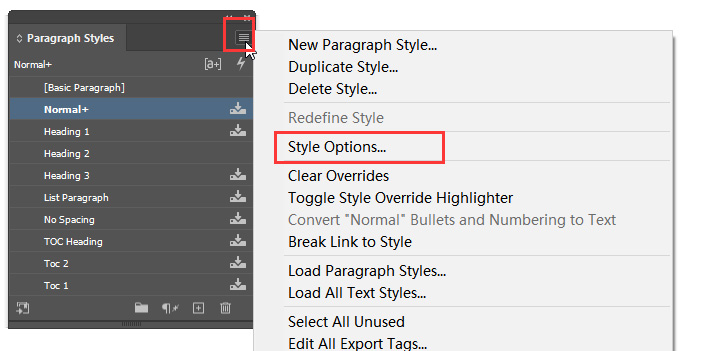
Should you need to modify a style, simply go to More Options > Style Options… in the respective panel and choose the category you wish to adjust. Whether it's tweaking the Basic Character Formats in Character Styles or adjusting the Justification in Paragraph Styles, these changes will automatically apply to all instances of the style within your document.
Applying styles
To apply a style, select the text or characters and click on the desired style in the Paragraph or Character Styles panel. For more complex documents, consider using nested styles or automatically switching to a new style for the next paragraph to streamline your workflow.
Managing overrides and defaults
If you override a style manually, you can revert it to its original definition by right-clicking the style and choosing Redefine Style. This helps with consistency across your document. For attributes common across most styles, like default kerning, set these when no document is open. These settings then become the default for all future documents, saving time and guaranteeing consistency.
By mastering Paragraph and Character Styles in Adobe InDesign, you can efficiently manage the typography of your book. Remember, these styles not only save time by allowing for global changes with just a few clicks but also empower you to maintain a consistent visual theme throughout your publication.
Advanced typography tips
To manage more advanced typography within Adobe InDesign, it's essential to understand and use the comprehensive set of tools available for fine-tuning text and enhancing readability and aesthetic appeal. Here are some advanced techniques:
Manual kerning: Use Alt/Option + right arrow to increase space between two specific letters, and Alt/Option + left arrow to reduce it. This fine adjustment can dramatically improve the visual harmony of your text.
Tracking: Adjust the spacing across groups of letters or entire words to achieve a uniform appearance or to address layout challenges such as widows and orphans. This is particularly useful in headers and captions where text space is premium.
Leading: To enhance legibility, especially in dense text areas like headlines or captions, consider setting your leading at 130–140 percent. This spacing ensures that text is more digestible and less cramped.
Baseline shift: This feature allows for the vertical adjustment of text, enabling certain characters or words to stand out by positioning them above the regular text line. Accessible through the Character panel, it's a subtle yet powerful way to draw attention or denote significance.
Drop caps: Begin paragraphs with large, decorative letters or words by customizing settings in the Paragraph Styles panel. This not only grabs attention but also adds a stylistic flair to your pages.
Text alignment: Use the Paragraph panel to choose between left, centered, right, or justified alignment. This decision should be guided by the overall design aesthetic of your book and the readability of your text.
In addition to these manual adjustments, Adobe InDesign's composition engines — namely the single-line and multi-line composers — play an important role in determining the optimal fit of type within a text frame and the best breakpoints for lines. The multi-line composer, unique to InDesign, evaluates breakpoints across a specified range of lines, optimizing for compositional beauty and coherence. On the other hand, the single-line composer focuses on one line at a time for a faster, though sometimes less refined, result. Both these engines, coupled with the ability to inset text away from the frame edges and adjust text frame options, empower you to produce layouts that are not only visually appealing but also highly readable.
Leveraging these advanced typography tips and tools within Adobe InDesign will elevate the quality of your book layout, ensuring that each page is a pleasure to read and a testament to your attention to detail and design proficiency.
Working with images
While many books such as genre novels rarely have interior images, incorporating images into your Adobe InDesign book layout, even if only simple graphic shapes between paragraph titles and the main text, significantly enhances the visual appeal and supports the flow of your text. Here's how to work seamlessly with images:
Importing and placing images
To import, navigate to ‘File > Place' or simply drag and drop the image into your workspace. Upon import, images are contained within frames, which can be adjusted using the handles.
You can move each image within a frame independently.
For multiple images, use ‘File > Place' and select multiple files. If placing images in a specific layout, make sure the ‘Replace Selected Object' checkbox is unchecked to maintain the layout integrity.
Adjusting and fitting images
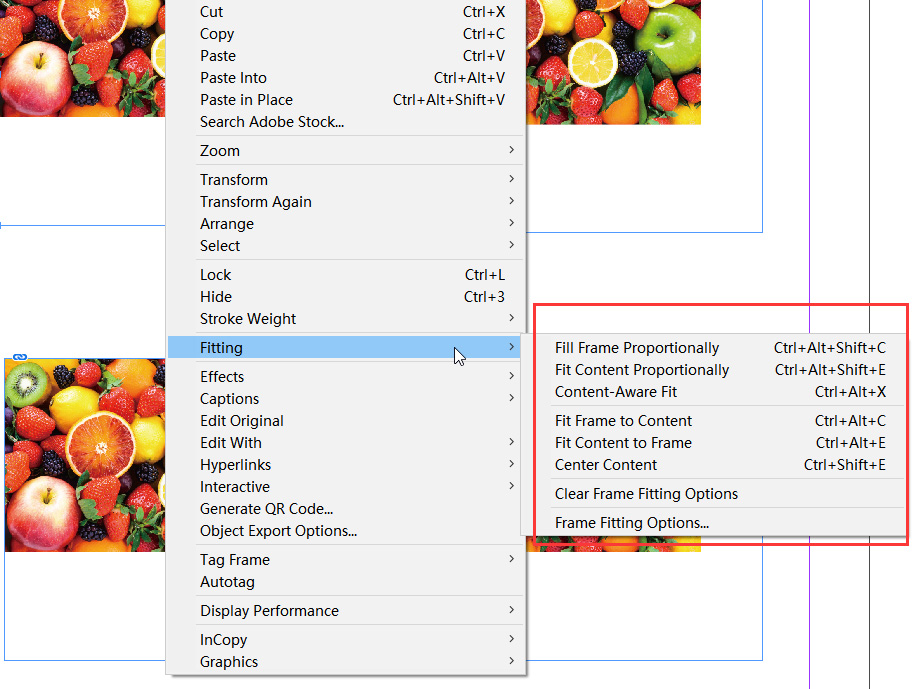
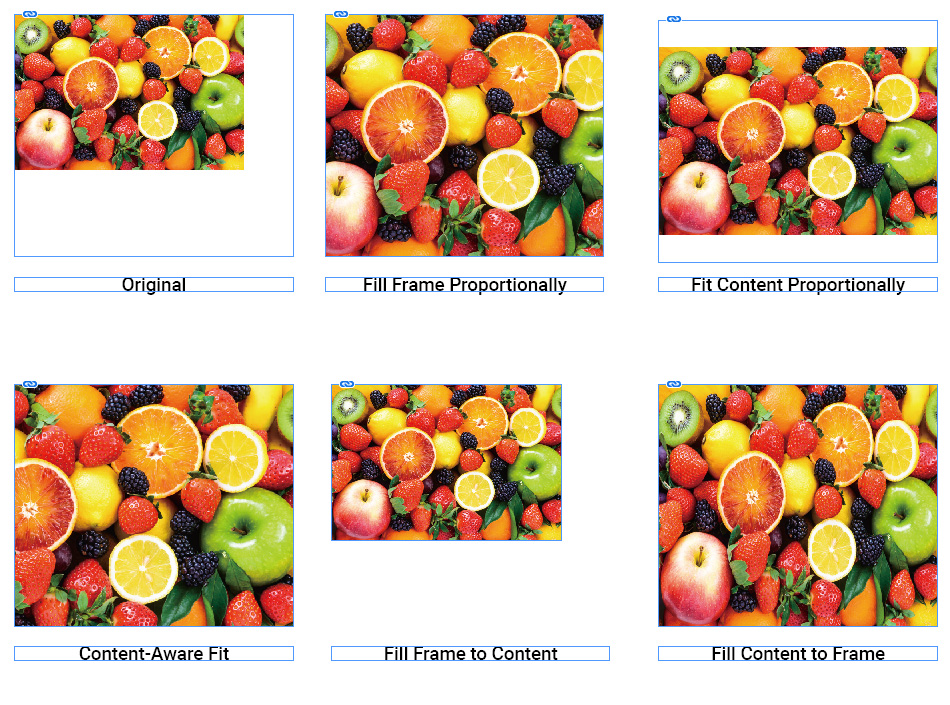
Object fitting options include Fill Frame Proportionately, Fit Content Proportionately, and Center Content, among others, accessible by right-clicking the image.
To scale images, select the image (not the frame) and use corner handles or the ‘Scale' tool for adjustments. Holding ‘Shift' maintains the image's proportions.
Use the ‘Frame Tool' or convert text/shapes into frames via ‘Type > Create Outlines.' Images can be added to shapes by using ‘File > Place' and selecting ‘Replace Selected Item.'
Image quality and management
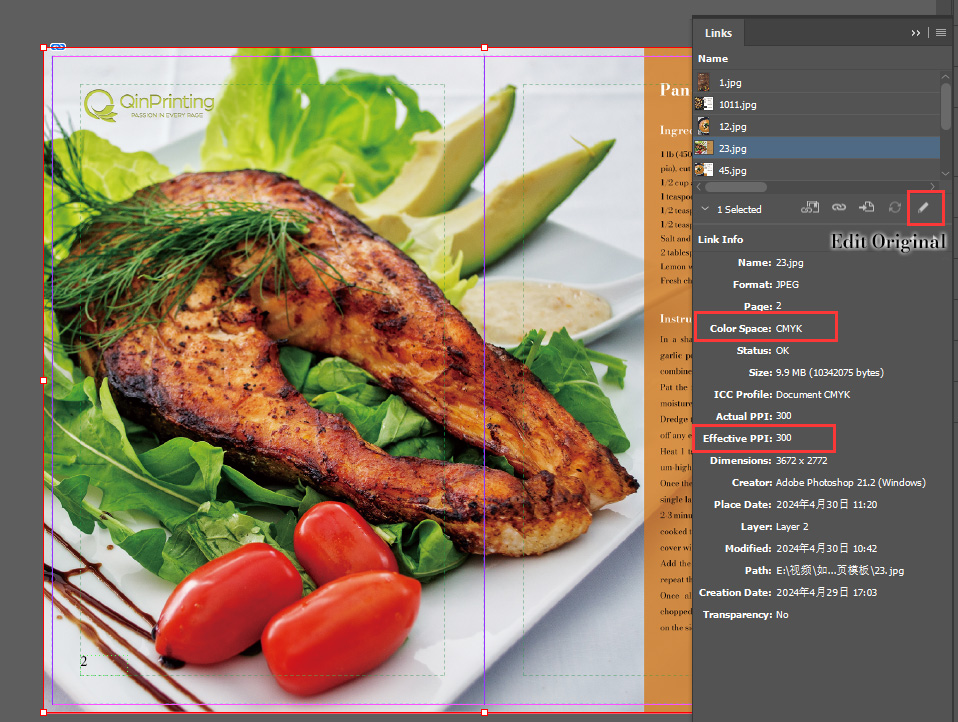
Make sure all images are high-resolution (minimum 300 dpi) and in CMYK color mode, which is essential for print quality.
Images in InDesign are linked to their source files. If an image is edited externally, InDesign flags this for updating to make sure the layout reflects the most current version of the image.
So that images flow with the text, anchor them at the desired points within your text. This is especially important for layouts where text and images interact closely.
Remember, while images add a dynamic element to your book layout, the key is to maintain balance and use them to complement the text rather than overshadow it. Properly managed and adjusted images can transform a simple book layout into a compelling visual narrative, enriching the reader's experience. Of course, many coffee-table style books, art books, and fine art photography books place images as the focus and the text may play only a supporting or explanatory role.
Margins, trim, and bleed explained
When you use Adobe InDesign to prepare a book layout for professional printing, understanding the concepts of margins, trim, and bleed is incredibly important for making sure your book layout is precisely as you want it when we print it. Let's break down these terms to help you gain clarity and precision in your designs:
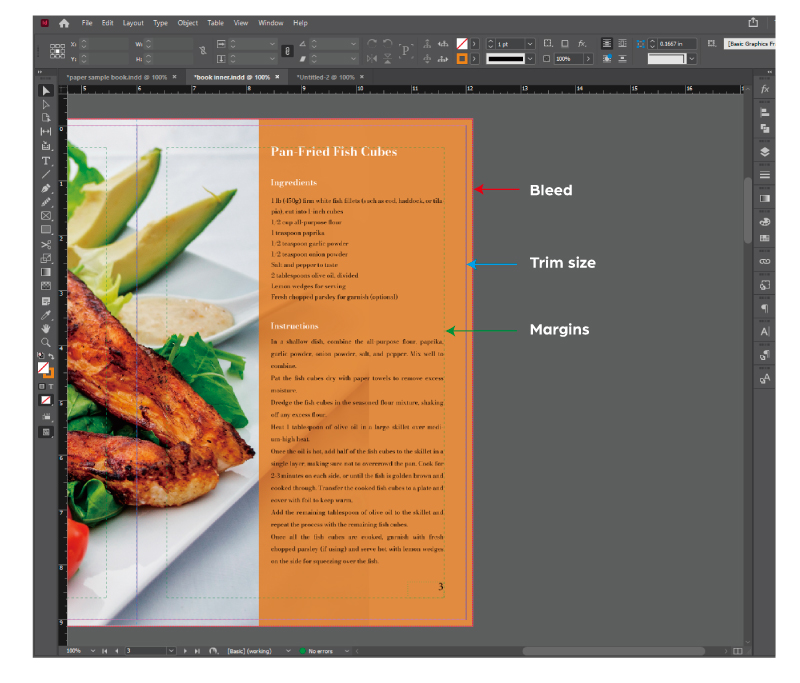
Margins
Margins are the spaces around the page content. They serve as a critical buffer, providing breathing room for your text and images and preventing any loss of information during the trimming process. You can adjust the margins, columns, and gutter for the current page in the properties panel or under the layout menu. As a best practice, set your margins/safe area to at least .25" (6 mm). This ensures that text, crucial parts of photos, logos, and other vital elements of your design are not inadvertently cut off.
Trim size
The “trim” refers to the final size of the document after it has been printed and cut down to size. This is the dimension your book will measure when it reaches your readers' hands. Trim Size is, therefore, the ultimate goal you're working towards. When setting up your document in InDesign, check you have the correct trim size from the get-go to avoid any layout issues later on.
Bleed and safety margin
Bleed is an area extending past the edge of the page, acting as a margin of error during trimming to avoid white lines around the document. It's essential for any document intended for print, especially if your design reaches the edge of the paper. Typical bleed values are .125 inches (3mm), but this can vary based on your project requirements. The “safety margin” is an additional space inside the bleed line, ensuring that your text will not get cut off inadvertently.
When you're designing, it's super-important to extend all graphical elements all the way to the bleed area to make sure that when trimmed, there are no unprinted areas left.
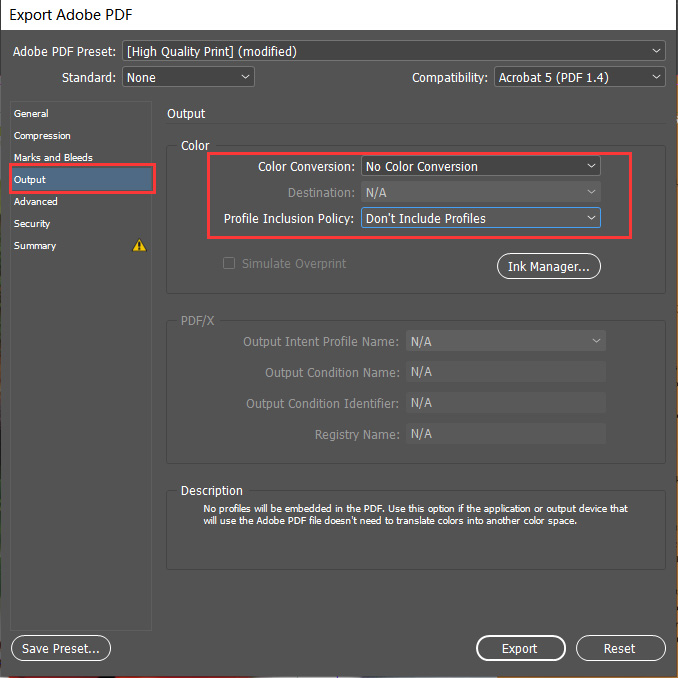
Export your document as a PDF (Print) by going to File > Export and selecting Adobe PDF (Print). Under Marks and Bleeds, check All Printer's Marks and Use Document Bleed Settings to guarantee your design is print-ready. Remember, the area outside the bleed is the ‘slug area', used for adding information about the document that the printer needs to know but will be trimmed off and discarded after printing. By meticulously managing these aspects, you get a seamless transition from digital design to printed book, preserving the integrity and aesthetic of your work.
Navigating through layers and objects
Navigating through layers and objects in Adobe InDesign is integral to organizing your book layout efficiently and effectively. Here's a structured approach to mastering this aspect:
Accessing and managing layers
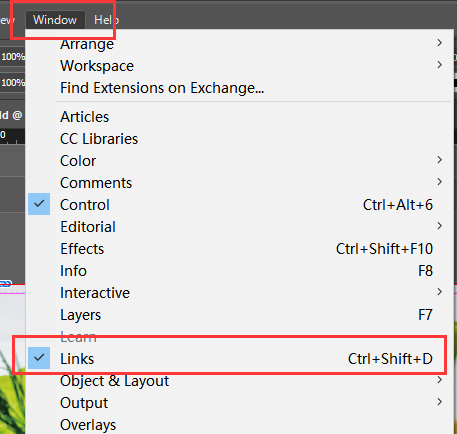
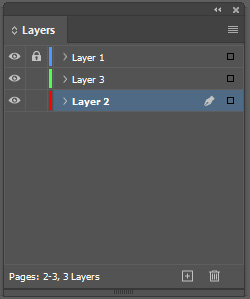
Access layers panel: Click on ‘Layers' under the Window menu or use the shortcut (F7) to open the Layers panel. This panel is your central hub for layer management.
Creating new layers: For new layers, either select the New Layer command from the Layers panel menu or click the New Layer button at the bottom of the panel. Each document starts with a single layer named ‘Layer 1', but you can add as many as you need for different types of content like text, images, or graphics.
Reordering: You can reorder layers by clicking and dragging within the Layers panel. The order is crucial as content on the topmost layer appears above all other content.
Visibility and locking: Use the Visibility icon (eyeball) next to a layer to hide or show its contents. You can lock a layer by clicking the square immediately to the left of the layer name, preventing any modifications to the objects on that layer.
Renaming and deleting: Double-click a layer to rename it for better organization. You can delete layers by dragging them to the Delete icon at the bottom of the panel or by selecting Delete Layer from the Layers panel menu.
Working with objects on layers
Adding objects to layers: You can add objects to layers by creating new ones with the Type tool or drawing tools, importing, placing, or pasting text or graphics. Remember, objects cannot be drawn or placed on a hidden or locked layer.
Moving objects between layers: To move an object to a different layer, click and drag the red square (selection icon) next to the item in the Layers panel to the new layer.
Selecting multiple items: Hold the Shift key and click the green square next to each item in the Layers panel to select multiple objects.
Editing Restrictions: Note that you can't edit hidden layers and objects and they won't appear on the screen or in print. So always check that layers are visible and unlocked before attempting to make changes.
Advanced layer functions
Paste remembers layers: Use the Paste Remembers Layers command to control how objects pasted from other locations interact with the existing layers in your document. This function is particularly useful for maintaining the integrity of complex layouts.
Creating versions: You can use layers to create different versions of projects by turning items off and on for viewing, working on your layout, and even for printing. This flexibility is invaluable for comparing layout options or preparing different editions of your book.
By leveraging the power of layers and objects in Adobe InDesign, you can significantly enhance the organization and efficiency of your book layout process. Understanding these tools allows for a more streamlined design workflow, ultimately contributing to a polished and professional final product.
Laying out chapters and sections
In Adobe InDesign, effectively laying out chapters and sections is key to creating a cohesive and navigable book design. Here's how to manage this process efficiently:
Creating sections for different chapters
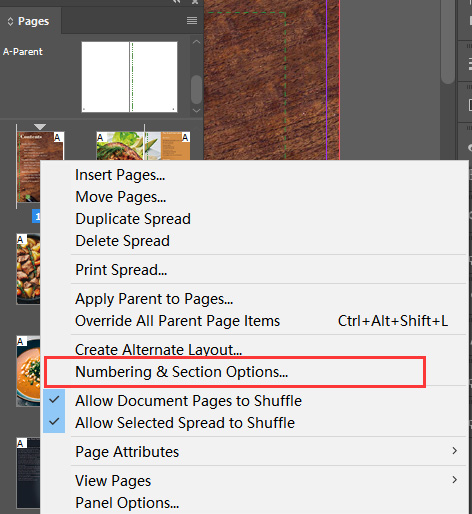
Initiating a new section: Navigate to the ‘Pages' panel, right-click, then choose “Numbering and Section Options”, where you can customize the section's parameters.
Section labeling: Within the Numbering and Section Options dialog box, under the ‘Section' tab, you have the option to assign a specific label or marker to your section. This label appears in the Pages panel, aiding in the organization and identification of different sections or chapters.
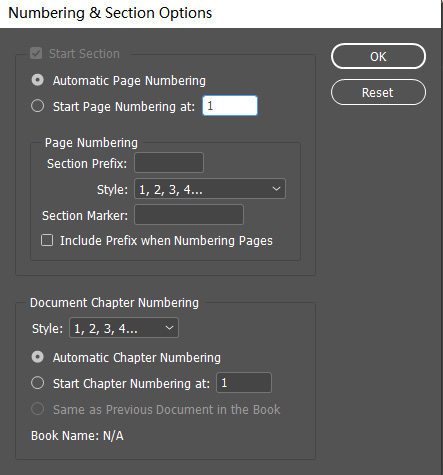
Automatic page numbering: InDesign facilitates automatic numbering for each section, which can be configured in the same dialog box. This helps make sure that page numbers flow correctly throughout the book, even if chapters or sections start anew.
Starting a new section: To designate the beginning of a new section, select the desired start page in the Pages panel, then opt for Numbering & Section Options. Here, you can set the Start Page Numbering at 1 or another number, establishing a clear demarcation between sections.
Renumbering sections: If you need to adjust the numbering of a specific section — for instance, beginning section 2 at page 1 — simply select the first page of that section, access Numbering & Section Options, and adjust the Start Page Numbering accordingly.
Advanced numbering options: InDesign also provides advanced numbering features, such as incorporating chapter numbers or opting for varied numbering styles like Roman numerals. These options offer flexibility to match the stylistic needs of your book layout.
Practical tips for section management
Use section markers: Beyond the Pages panel, you can directly place section markers on document pages themselves. This is particularly useful for instances where you want a section marker to appear mid-page or in a specific location.
Master page integration: Adding pages to a section automatically tags them with the section marker, provided you are using a designated master page. This gives consistency in headers or footers that reflect chapter or section changes.
Efficient organization: By clearly labeling and numbering sections, navigating through your document becomes more intuitive, both during the design process and for the reader. This structure supports a logical flow of content, essential for a positive reading experience.
By following these steps, you can master the art of laying out chapters and sections in Adobe InDesign, making sure your book is well-organized and easy to navigate.
Adding page numbers and headers/footers
Adding page numbers and headers/footers to your Adobe InDesign document enhances its navigability and professionalism. Here's a systematic approach to incorporating these elements:
Adding page numbers, alignment, and styling
Navigate to the Master Page.
Select the ‘Type' tool, draw a text box where you want the page number.
Go to ‘Type' > ‘Insert Special Character' > ‘Markers' > ‘Current Page Number'.
To change the page number's font, size, or style, adjust the settings in the paragraph panel.
For alignment, use the selection tool to select the text box, then navigate to ‘Object' > ‘Text Frame Options' and adjust the vertical justification.
To exclude page numbers on specific pages, create different sections. Right-click on the page where a new section starts, select ‘Numbering and Section Options', and customize your settings.
For Roman numerals or other styles, modify this in the ‘Numbering and Section Options'.
To layer page numbers over objects, create a new layer on the master page, ensuring it's above all others, then lock it.
How to create headers and footers
Running headers can be dynamic, using text variables for elements like chapter titles.
To create, select the ‘Type' tool, drag to create a text box at the desired header/footer location, and enter your content.
Duplicate the text box for symmetry on facing pages using Control C and Control V.
Headers on even pages often feature the book title, while odd pages might display the author's name or chapter title. Now, let's look at footers.
Format the footer text by adjusting font, size, alignment, and other properties through the Type Tool.
Insert automatic page numbers in footers by placing the text cursor in the desired location and navigating to ‘Type' > ‘Insert Special Character' > ‘Markers' > ‘Current Page Number'.
Remember, the positioning and styling of page numbers, headers, and footers should match the overall design theme of your book, maintaining a balance between aesthetic appeal and functionality.
How to prepare your book for printing
As you approach the final stages of your book design process in Adobe InDesign, preparing your book for printing is an exciting step. This involves a few key actions to guarantee that your book's physical copy mirrors the quality and precision of your digital design. Here's how to make your book print-ready:
Creating a print-ready PDF
The first step is to review your document. Before exporting, thoroughly verify your document in InDesign for any layout errors or missing elements. This includes checking for overset text, incorrect page numbering, and making sure all images are high resolution (300 dpi or more) and in CMYK mode. Then, follow this process:
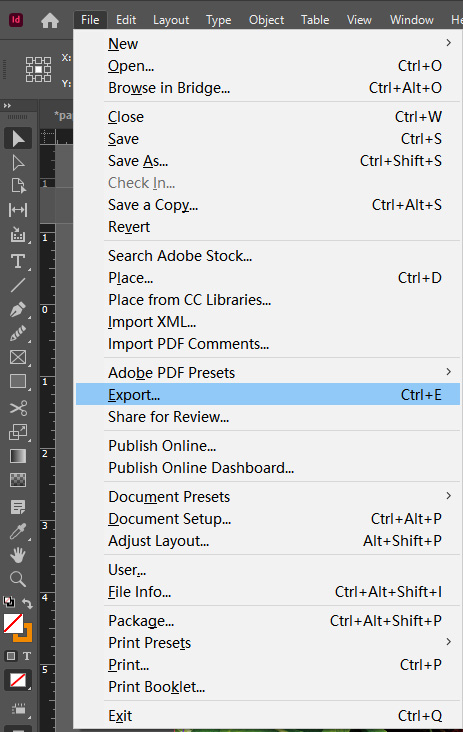
In Adobe InDesign, navigate to File > Export.
Select Adobe PDF (Print) from the format options.
Use the High Quality print preset. This setting is optimized for printing documents that require high resolution and guarantees that all fonts and images are embedded correctly.
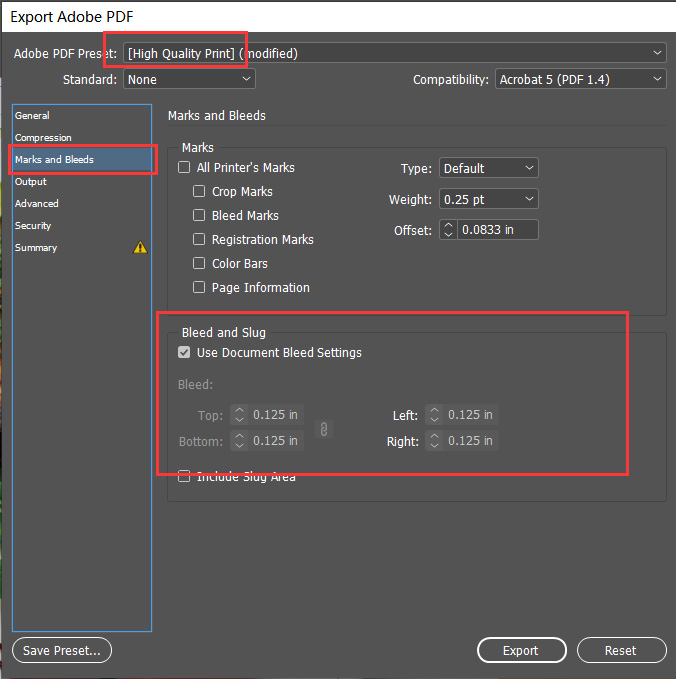
Under Marks and Bleeds, be sure to select All Printer's Marks and Use Document Bleed Settings. This step is vital for maintaining the correct bleed and trim during the printing process.
Use the Preview function to view a summary and check everything is set up correctly before sending your book to us to print.
The transition from digital design to print requires attention to detail and a clear understanding of the printing process. With Adobe InDesign's robust features and your careful preparation, your book will be ready to make its mark in the hands of readers.
Always review the final PDF to check for any errors and correct any issues found during the review process. If the number of pages in your document is odd, InDesign will automatically add blank pages to evenly fill out the book, guaranteeing a smooth printing process.
Final steps before printing
Once you're satisfied with your print-ready PDF, send it to us either via email or using a third-party file sharing services such as Dropbox. Our experts will manually check it. If we find errors, we'll help you fix them. Once the document is good to go, we'll send you a proof or sample to check. Once you've looked over that and you're happy, give us the green light and we'll print your books!
Talk to us!
Throughout this in-depth blog post, we've covered the essential techniques and insider tips to master book layout with Adobe InDesign. From grappling with the nuances of text typography to managing the complexities of exporting your book for printing, each section has been designed to equip you with the skills necessary to transform your manuscript into a polished, professional publication. The practical tips we've shared here aim not just to simplify the design process but also to inspire creativity and precision in your work, so that the final product exceeds expectations.
We hope this guide serves as a foundation upon which to build your design prowess, encouraging you to explore further, experiment boldly, and always strive for excellence. Whether you're a seasoned designer or a self-publishing author designing for the first time, the journey from manuscript to masterpiece is a rewarding one, made all the more successful by the powerful capabilities of Adobe InDesign.
When you're ready to get started on designing and printing your book, QinPrinting is here to help and support you from the first steps to the final delivery of your beautiful professionally printed edition. So, let's talk. We can't wait to make your next book the most beautiful yet.
Enjoy this article? Share it with your friends and colleagues!
Susan Han is a printing expert with 25 years industry experience. She is currently the CEO of QinPrinting and leads the team that has helped thousands of clients to realize their print projects. You can reach out to her and the rest of the team at [email protected]
This is an incredibly thorough guide. I completely appreciate it. There are a few things I'm wondering, like if you are designing guidebooks with illustrations and you want to "link" the images LOCATIONS to the text...what is the best practice for that. AND if a book is 500 pages or more...what are best practices for layout - because some instances when my books are unwieldly Indesign crashes multiple times. So yea, sure, I can break up the book in sections sometimes - and sometimes for reflow purposes it's not a good idea to break it up. What is best practices for large/long format books?
Hi Reese,
Thanks so much for your message. The issues you ask about—positioning of linked text and photographs in the layout and working with documents over 500 pages—are good questions! They're also issues for which there's no "one size fits all" answer. How to approach and solve these creative design issues needs working out project by project depending on the content and aims.
Susan will get back to you soon to discuss your specific needs in detail. In the meantime, feel free to email us at [email protected] or call us at +1 951 866 3971, and we'll be delighted to assist further!