A complete guide to generating perfect print-ready PDF files using Adobe InDesign software; with video, screenshots, and text explanations to make your life that bit easier!
Creating a print-ready PDF file is an important step to make sure your design projects look professional and polished when printed. Whether you’re a book publisher, a tabletop game designer, a marketer, or an artist, preparing your designs correctly for printing can save you time, money, and potential headaches. In this blog post, we’ll guide you through the process of creating a print-ready design file using Adobe InDesign, one of the leading tools in the design industry.
At the top of this post, you’ll find a video tutorial that walks you through the steps visually. We encourage you to watch it for a hands-on demonstration. Alongside the video, this post will provide you with detailed explanations and additional tips to make sure you understand each step thoroughly.
What is Adobe InDesign?
Adobe InDesign is a versatile desktop publishing software that is widely used by graphic designers, publishers, and marketing professionals. It allows users to create stunning layouts for both digital and print media, making it an essential tool for anyone involved in design. With InDesign, you can handle multi-page documents effortlessly, manage complex typography, and integrate multimedia elements seamlessly.
Adobe InDesign is part of the Adobe Creative Suite and specializes in layout design. It’s particularly popular for creating magazines, books, brochures, and other print materials. InDesign offers powerful tools for precise control over typography, page design, and visual consistency, making it the go-to choice for professional designers.
InDesign’s features include advanced text formatting, support for vector graphics, and extensive “pre-flight” and printing options. With tools like master or parent pages, paragraph and character styles, and the ability to manage linked assets, InDesign streamlines the design process and enhances productivity.
Other Adobe tools that might interest you
- Adobe Photoshop: The industry standard for photo editing and manipulation, Photoshop allows designers to enhance images, create digital artwork, and prepare graphics for various media.
- Adobe Illustrator: Ideal for creating scalable vector graphics, Illustrator is used for logo design, illustrations, and any artwork that requires precision and scalability.
- Adobe Acrobat: Essential for managing and editing PDF files, Acrobat ensures your documents are secure, accessible, and print-ready.
So, that’s your introduction to the Adobe tools. But you want to know how to get your designs print-ready using InDesign, right? Let’s dive in!
Setting up your document in Adobe InDesign
To start your design project, open Adobe InDesign.
After launching Adobe InDesign, you’ll be greeted with the home screen. From here, click on the “Create New” button, which will open the “New Document” dialog box. This dialog box is where you’ll define the dimensions and layout of your new document. Pay close attention to the options available, as these initial settings will form the foundation of your design.
In the “New Document” dialog box, you’ll need to specify the final size of your printed product. Enter the width and height based on your project requirements, such as 6 x 9 inches, for a standard trade paperback book or custom dimensions for a unique project. Make sure you select the appropriate units of measurement. Accurate dimensions are essential to avoid any resizing issues later on.
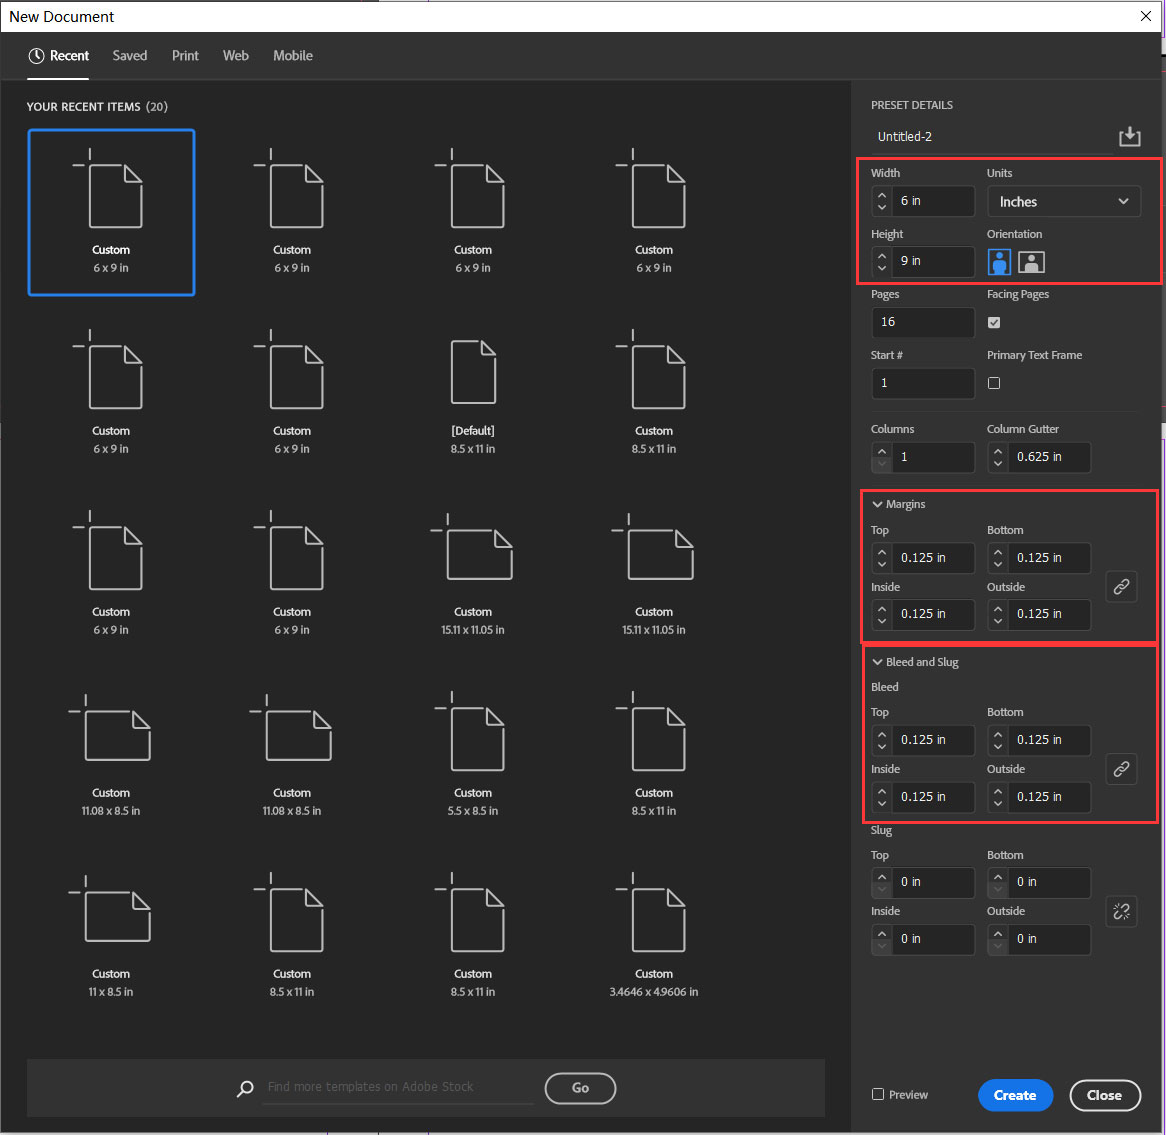
Explanation of margins and bleeds
Margins and bleeds are critical components in print design. Margins act as a buffer zone around the edges of your document, while bleeds extend beyond the final size to make sure no unprinted edges are left after trimming. Always add at least 0.125 inches (3 mm) for bleeds. This extra space allows for slight cutting variations during the printing process, preventing any unwanted white edges on your final product.
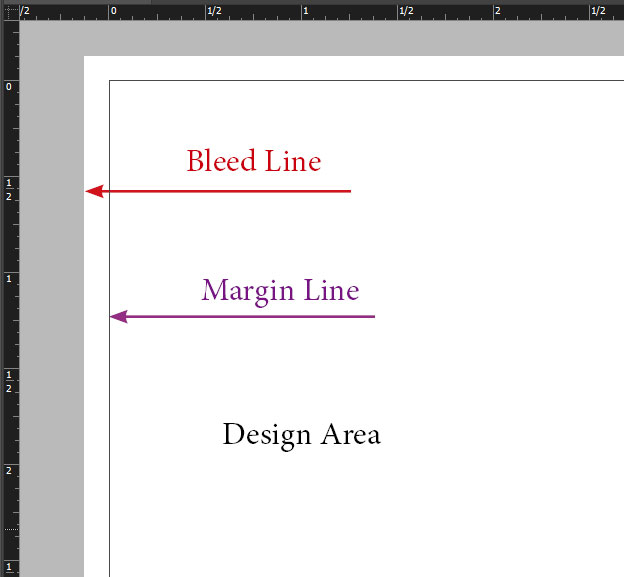
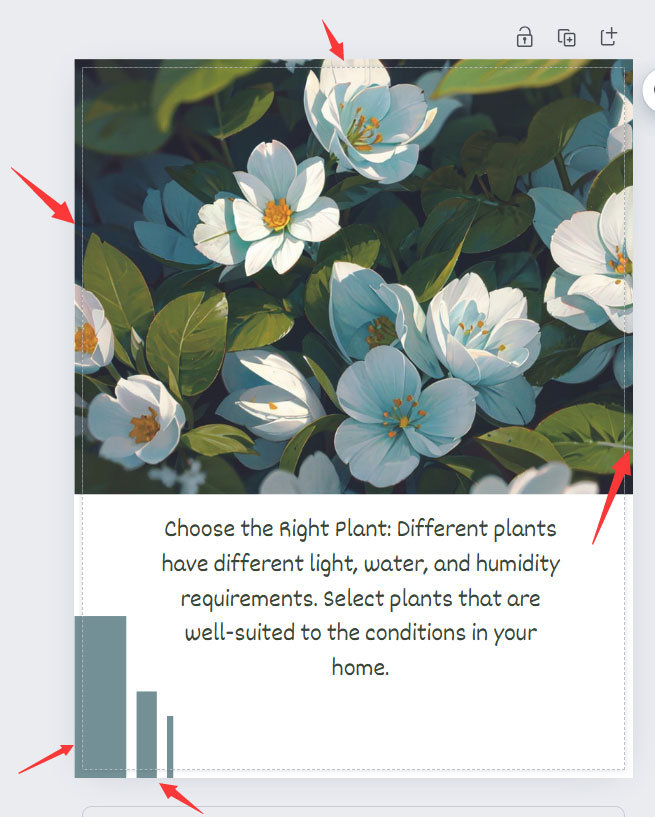
The white design area and red bleed lines
When you set up your document, you’ll notice different colored lines indicating various zones. The white area represents your actual design space, where the main content will be placed. The red lines outside the white area denote the bleed lines. Extending your background elements and images to these red lines ensures they will be trimmed correctly, avoiding any unsightly borders on the finished product.
The "safety zone" and purple lines
The purple lines in InDesign represent the “safety zone,” also known as the live area. This area is slightly smaller than the final document size, creating an inner margin. Keep all critical elements such as text, logos, and key graphics within this zone to make sure they aren’t accidentally trimmed off. This precaution helps maintain the integrity of your design and ensures all vital information remains visible and intact after printing.
By following these initial steps and understanding the importance of margins, bleeds, and safety zones, you’ll set a strong foundation for your print-ready PDF file. Proper setup is the key to avoiding common pitfalls in print design and achieving a professional, polished final product.
Choosing the right color profile and working with colors
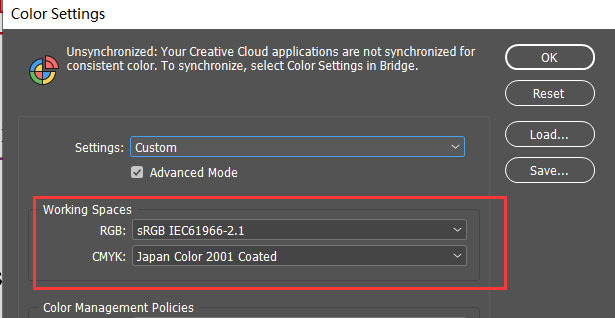
Color profiles are essential to guarantee that your printed materials look as expected. A color profile defines how colors are represented in your document and how they will be interpreted by various devices, from your computer screen to the offset printing machine. Using a standardized color profile helps with consistency and accuracy in color reproduction. For general use, we recommend the “Japan Color 2001 coated” profile. This profile is widely used and trusted in the printing industry, providing a good balance of color fidelity and predictability.
Importance of using CMYK for print
Understanding the difference between CMYK and RGB color modes is important for print design. CMYK, which stands for Cyan, Magenta, Yellow, and Key (Black), is the color model used in color printing. In contrast, RGB (Red, Green, Blue) is used for digital screens. When designing for print, always use CMYK to ensure your colors will be accurately reproduced. RGB colors can appear differently in print due to the conversion process, which can lead to unexpected results.
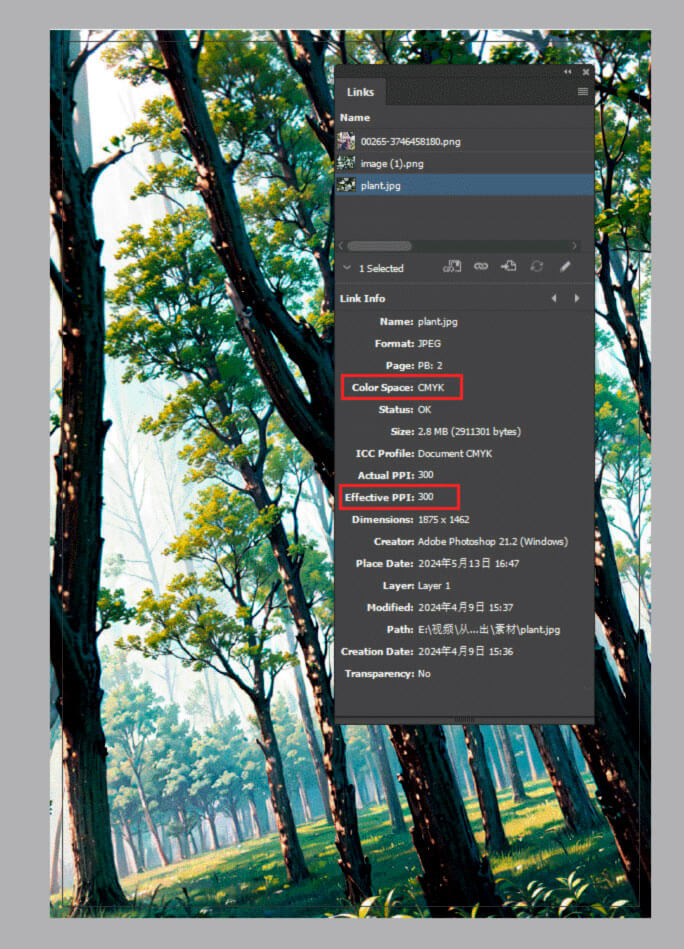
To maintain high quality in your printed materials, make sure all your images, graphics, and illustrations are in CMYK color mode and have a resolution of 300 dpi (dots per inch). This resolution means that your images will be sharp and clear without pixelation or blurriness. You can convert images to CMYK in software like Adobe Photoshop before placing them in InDesign.
In InDesign, you can check the color information of individual images by using the “Links” panel. This panel provides detailed information about each linked file in your document, including its color mode and resolution. Double-clicking on a link will open the image in the appropriate application, allowing you to make any necessary adjustments. Check that all images are correctly set up in CMYK and at the right resolution when preparing your document for print.
Designing with margins, bleeds, and safety zones
When designing your layout, make sure to extend background colors and images all the way to the bleed lines. Any element that touches the edge of your document should extend beyond the trim line to the bleed line. To avoid cutting off important content, keep all critical design elements, such as text and key graphics, within the safety lines (purple lines).
One common mistake in print design is placing essential elements too close to the edges of the document. This error can result in critical information being cut off during trimming. Always check there is sufficient space between the important content and the edges of your design. Another pitfall is not extending backgrounds to the bleed lines, which can lead to unwanted white borders. By following best practices for margins, bleeds, and safety zones, you can avoid these issues and guarantee your final printed product looks professional and polished.
How to export your design as a print-ready PDF
Exporting your design correctly is the final step in preparing a print-ready PDF. Adobe InDesign provides various settings to make sure your file meets the required standards for professional printing. Here’s how to do it:
- Once you’ve completed your design, go to the File menu and select “Export.” In the dialog box that appears, choose “Adobe PDF (Print)” as the format. This option is specifically designed for creating high-quality print files, so that all the necessary print settings are included.
- In the Export Adobe PDF dialog box, you’ll see several preset options. Select “High Quality Print” from the list. This preset is optimized for creating PDFs that retain the best possible quality for printing, to make sure that your images and text look sharp and clear.
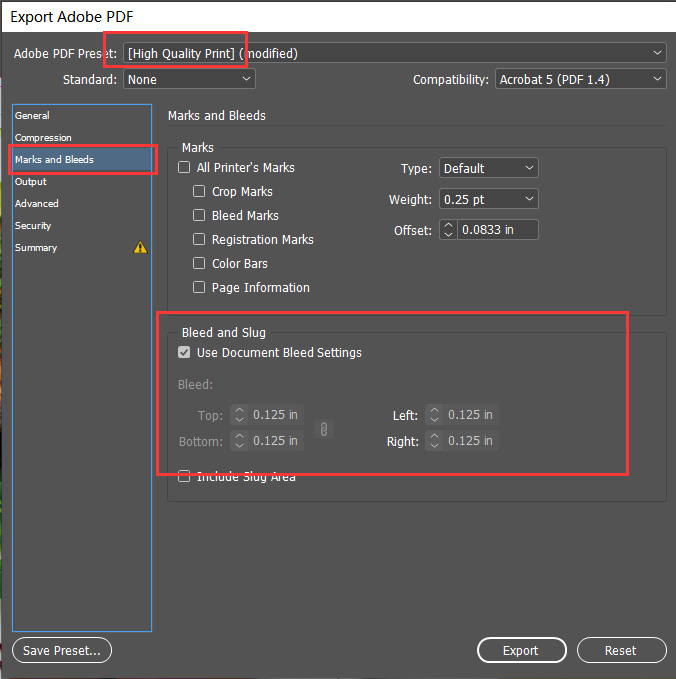
- Under the “Marks and Bleeds” section, make sure to check the “Use Document Bleed Settings” box. This setting means that the bleed areas you set up in your document are included in the exported PDF. Bleeds are critical for preventing any unwanted white edges after the document is trimmed.
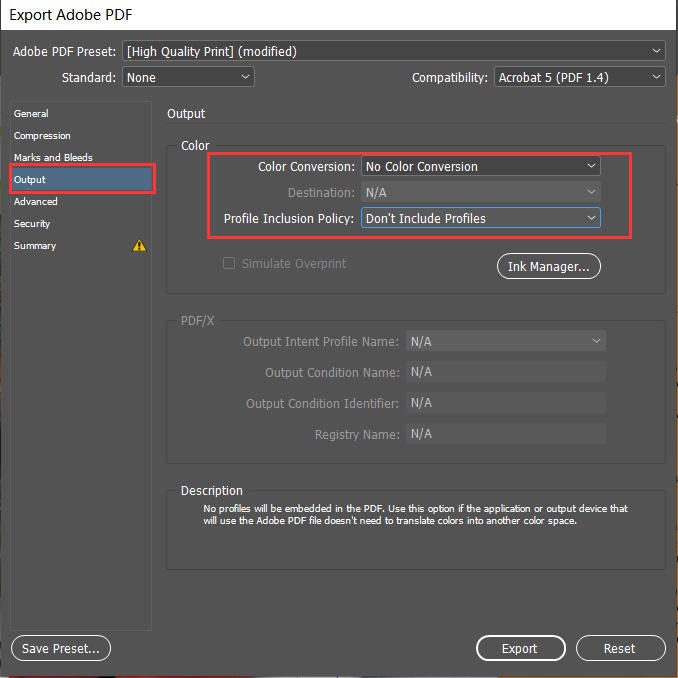
- In the “Output” section, set the “Color Conversion” to “No Color Conversion” and select “Don’t Include Profiles.” This makes sure that the colors in your document remain as you intended, without any alterations during the export process. Including profiles can sometimes lead to unexpected color shifts, so it’s best to avoid them.
Verifying the final PDF
After exporting your PDF, open it in Adobe Acrobat or another PDF viewer to double-check that the bleeds are included. Look at the edges of your document to make sure the background elements extend to the bleed lines, providing the necessary margin for trimming.
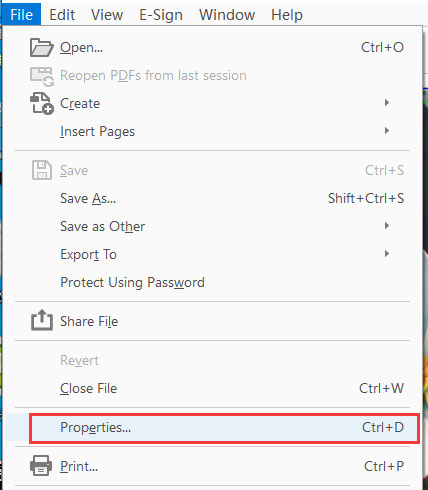
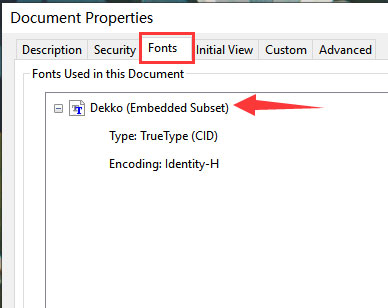
To confirm that all fonts are correctly embedded, open the PDF in Adobe Acrobat and go to File > Properties > Fonts. Check that all fonts list “Embedded Subset” next to their names. Embedding fonts guarantees that they will display and print correctly, even in the unlikely event that we don’t have the same fonts installed in our database.
By following these steps, you can create a print-ready PDF that meets professional printing standards, and make sure that your final product looks exactly as you intended.
Talk to us. We're here to help you!
Creating a print-ready PDF file in Adobe InDesign is an essential skill for any designer working on print projects. By setting up your document correctly, choosing the right color profile, and ensuring all elements meet printing standards, you can produce high-quality, professional results. In this post we’ve walked you through each step, providing detailed instructions and best practices to help you avoid common pitfalls and achieve the best possible outcomes.
Remember to watch the embedded video tutorial at the top of the page for a visual guide to complement this written guide. If you have any questions or need further assistance, feel free to get in touch. We hope this guide helps you create stunning print-ready designs that impress your clients, colleagues, customers, fans, or readers.
Thank you for reading, and happy designing! Don’t forget to subscribe to our monthly newsletter for more tips, tutorials, and insights into the world of design and printing. We look forward to working with you.