We've written this handy guide to printing a hardcover photography book full of useful tips and tricks to get you off to a good start with your project
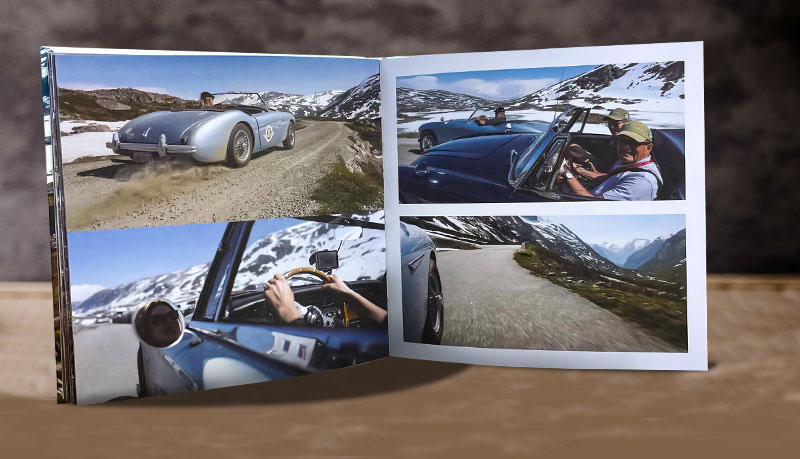
Creating a hardcover photography book is an exciting endeavor for any photographer. It's an opportunity to showcase your work in a format that's both professional and personal. However, if you've never designed a hardcover photography book before, the process can seem daunting. From preparing design files to selecting the right materials, there are many aspects to consider. In this guide, we'll walk you through the essential tips and tricks for successfully creating a stunning hardcover photography book.
Preparing your design files
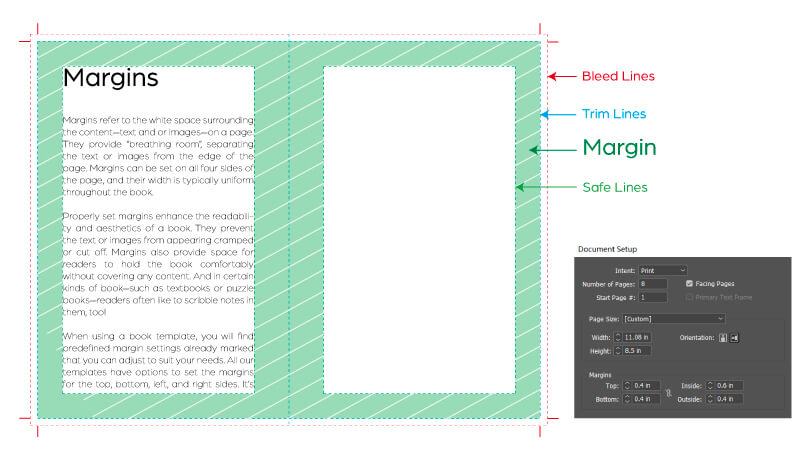
The first step in creating your hardcover photography book is to prepare your design files. Using professional design software like Adobe Creative Suite will give you the best control over your layout and deliver the highest quality results. Adobe InDesign is particularly suited for this type of project due to its robust features tailored for book design. Start by setting up your document with the correct dimensions and bleed settings. Bleed is the area that extends beyond the trim edge of your pages, and it's crucial for avoiding unwanted white borders on the edge of your prints and pages. Typically, a bleed of 0.125 inches or 3 mm is standard, but if you have specific customizations in mind, just let us know.
Understanding margins and safe zones
Understanding the importance of margins and safe zones is also essential when setting up your document. Margins are the space between the edge of the page and the content, ensuring that important elements aren't cut off during trimming. Safe zones, on the other hand, are areas within the margins where you should keep text and other crucial elements to prevent them from being too close to the edge. This consideration is particularly vital for maintaining a clean and professional look in your hardcover photography book. The exception is when you want a photo or a photo spread to fill the entire page right to the edges. In that case, you should extend the image beyond the trim lines to fill the boundaries of the bleed area. To make this easier, you can download one of our free book design templates. The page also has detailed instructions, including video and screenshots, about how to use the template to guide your book design.
Use high image resolution
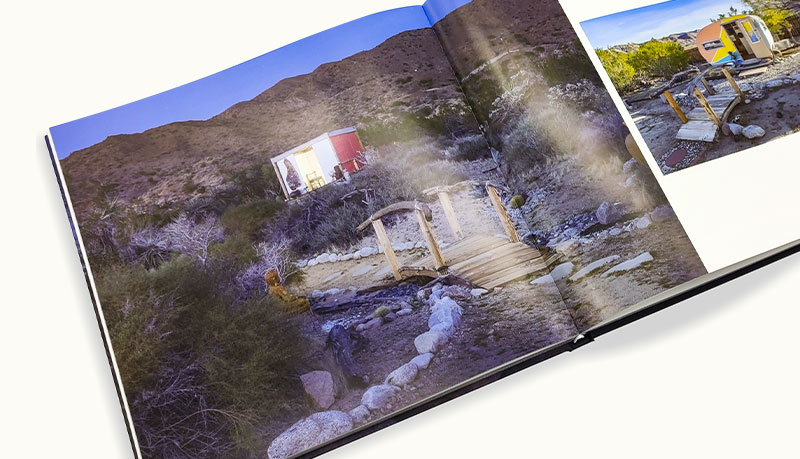
Image resolution is another critical aspect of preparing your files for print. Your photos should be at least 300 dpi (dots per inch) to make sure they appear sharp and clear in the final product. Lower resolutions may look fine on a computer screen but will appear pixelated and blurry when printed. Use high-quality, uncompressed image formats, such as TIFF or PNG. JPEGs can also be used, but be wary of compression artifacts that can degrade image quality. If your photos were shot in RAW format, process them carefully to maintain the highest possible quality.
Managing colors correctly
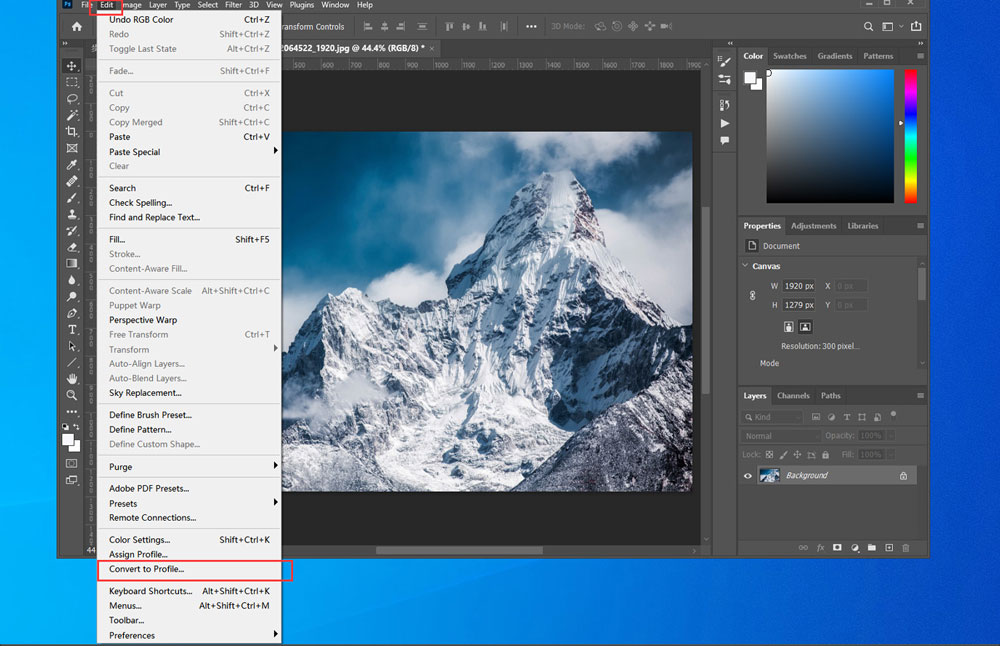
Color management is an often-overlooked element that can significantly affect the final appearance of your book. Monitors display colors in RGB (Red, Green, Blue) mode, while printers use CMYK (Cyan, Magenta, Yellow, Black) inks. Convert your images to CMYK before placing them in your design to see a more accurate representation of the printed colors. Adobe Photoshop has tools to help you with this conversion. Additionally, calibrate your monitor to ensure that the colors you see on screen closely match the printed output. This step is vital for achieving consistent and accurate colors in your hardcover photography book.
- Convert RGB to CMYK in Adobe Photoshop
1. Open your image in Adobe Photoshop, and click on Edit > Convert to Profile.
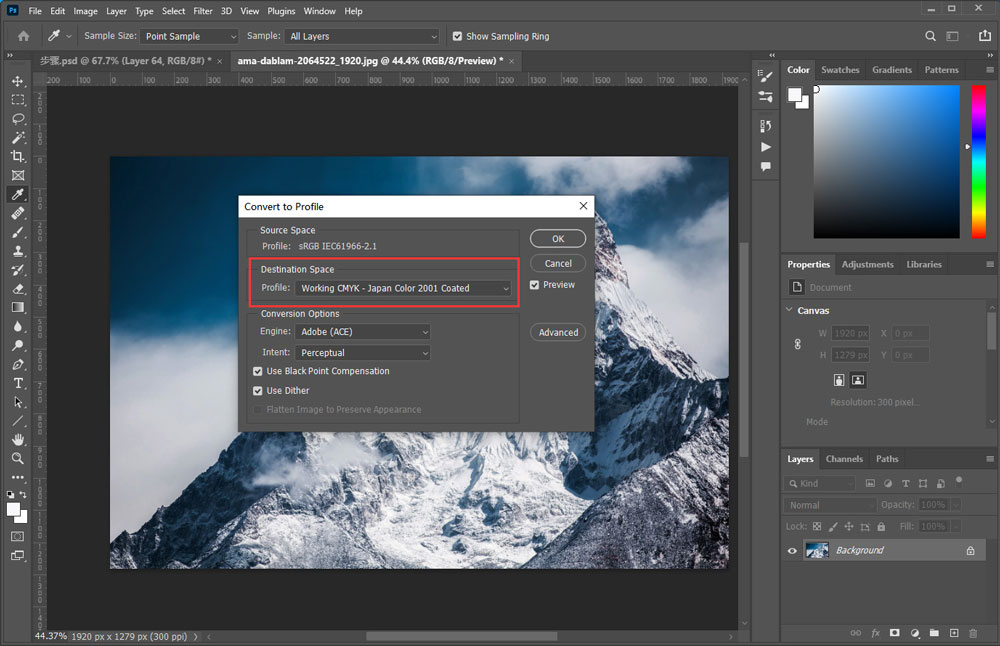
2. Choose the Profile: Japan Color 2001 Coated, then click OK.
Designing the cover
The cover of your hardcover photography book is the first thing people will see, so it's essential to get it right. When designing your cover, include the front, spine, and back in a single layout. This helps make sure that all elements align correctly when the book is bound. Pay special attention to the spine width, which will depend on the number of pages and the thickness of the paper you choose. Additionally, consider how the design elements flow from the front cover to the spine and back cover to create a cohesive look. If you work with us, you'll have a named expert consultant who will work with you and provide guidance on calculating the spine width accurately. They'll also be on hand to help you with any other aspects of the design and printing process and answer all your questions.
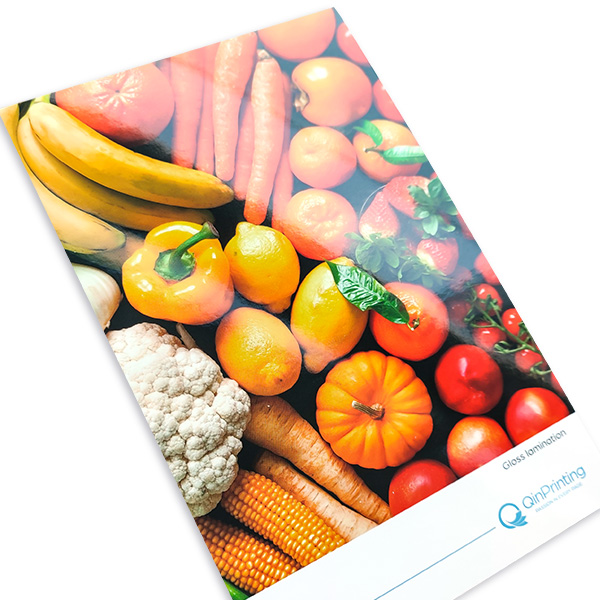
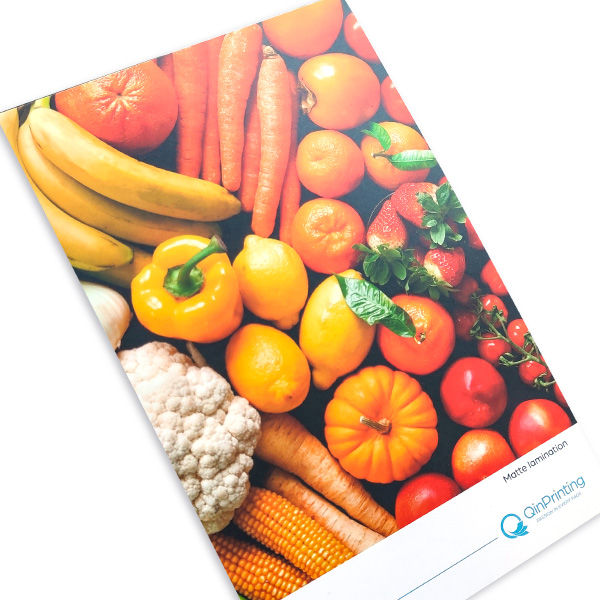
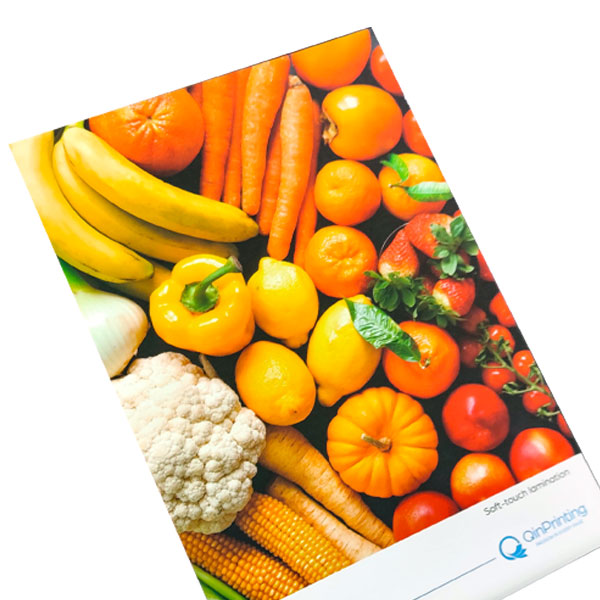
For the cover design, you might want to consider different finishes to enhance the look and feel of your book. Coated papers come in gloss, matte, and soft-touch lamination. Gloss lamination gives a shiny, reflective finish that makes colors pop, while matte lamination offers a more subdued, elegant look. Soft-touch lamination provides a velvety texture that adds a tactile element to your book. Each finish has its own aesthetic and protective properties, so choose the one that best complements your photography.
Planning the interior layout
The interior layout of your hardcover photography book should be as carefully considered as the cover. Begin by planning the sequence of your photos to tell a cohesive story or to highlight a particular theme. Use Adobe InDesign's grid and ruler tools to maintain consistent margins and alignments throughout the book. This not only enhances the visual appeal but also helps to create a professional finish. Consider the flow of the images and how they relate to each other. Think about whether you want to include full-page spreads, collages, or a combination of both to keep the viewer engaged.
Choosing the right typography
Typography also plays an essential role in your book's design. While your photos will be the focus, any text you include should complement them without detracting from the visual impact. Here are some key points to consider:
- Font Selection: Choose a clean, readable font for captions, titles, and any descriptive text. Avoid overly decorative fonts that might be hard to read.
- Consistency: Stick to one or two typefaces to maintain a cohesive look throughout your book.
- Font Size: Use font sizes that are large enough to read comfortably but not so large that they overpower the images.
- Spacing: Pay attention to the spacing between lines (leading) and between letters (kerning) to ensure that the text is aesthetically pleasing and easy to read.
Selecting the best paper
Paper selection of the interior pages is another vital consideration. The type of paper you choose will affect the weight, feel, and appearance of your hardcover photography book. Coated papers, like gloss and matte, enhance the vibrancy and detail of your photos. Gloss paper has a shiny finish that makes colors look vibrant but can produce glare under certain lighting conditions. Matte paper, on the other hand, offers a non-reflective surface that's ideal for a more subdued, elegant presentation. Uncoated paper provides a natural, tactile feel but may not deliver the same level of detail and color vibrancy as coated papers.
Binding and finishing touches
Binding is another important aspect of hardcover book design. The most common type is case binding, where the pages are sewn together in sections and then glued into a hardcover. This method is durable and allows the book to lie flat when open, which is particularly useful for photo books. Additionally, consider adding headbands and footbands, the small decorative strips of fabric at the top and bottom of the spine, for a traditional touch. These elements not only add to the book's aesthetic appeal but also reinforce the spine, contributing to the book's durability.
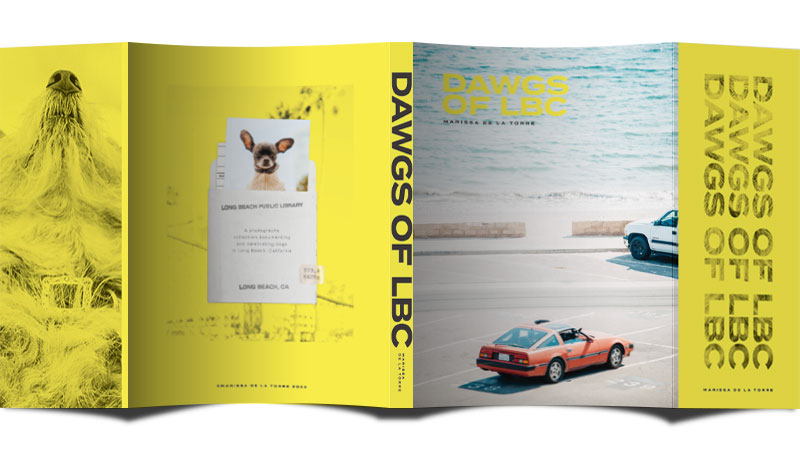
A dust jacket can also add a layer of sophistication and protection to your hardcover photography book. This removable cover, often printed on coated paper, can feature additional artwork or information and helps protect the book from wear and tear. If you choose to include a dust jacket, make sure your design incorporates the flaps that tuck inside the front and back covers. These flaps can be used for author bios, additional photos, or promotional blurbs. Remember to account for the extra width needed for the flaps when designing your dust jacket.
Proofreading and final checks
When your design is complete, thoroughly proofread every element. Check for typos, alignment issues, and color consistency. In any case, if you work with us, you'll have had a lot of expert help from your named consultant and our design and printing team will manually check all your files before we make up the proofs. Take advantage of this service to catch any errors and make necessary adjustments. A printed proof is particularly valuable as it allows you to see how your images and colors will look on the actual paper stock, providing an opportunity to make last-minute changes.
Working with your printer
Finally, when you're ready to print, work closely with your offset printer — obviously, we hope you'll choose us but there are other printers out there! — to discuss any last-minute details and confirm that all specifications are correct. At QinPrinting, have the expertise and experience to guide you through the process and make sure your hardcover photography book exceeds your highest expectations. Communication is key; don't hesitate to ask questions or seek clarification on any aspect of the printing process. We will be happy to provide support and advice to help you achieve the best possible results.
Talk to us!
So, creating a hardcover photography book involves careful planning and attention to detail. But by understanding the nuances of design software, image resolution, color management, cover design, paper selection, and binding options, you can produce a book that beautifully showcases your photography. With these tips and tricks, you'll be well on your way to creating a stunning hardcover photography book that you can be proud of. Whatever stage you're at with your project, we'd love to hear from you. Get in touch to discuss your ideas and needs and we'll be delighted to explain what we can do to help.
Shoot us an email to [email protected] or call us at +1 951 866 3971 and we'll be delighted to discuss your needs.

