Our step-by-step introduction to using our customizable book design templates in Adobe Illustrator, including simple text instructions illustrated with helpful diagrams and screenshots and a complete video guide
There's no doubt that the competition for attention in publishing—whether mainstream or independent—is fierce. Designing a beautiful and attention-grabbing book cover is one of the most important steps to make your work stand out on the shelves—whether those shelves are physical or digital. However, creating a professional cover from scratch can be a daunting task, especially if you're not a seasoned designer. That's where pre-made, customized book cover templates come in handy. Templates help guide you through the design process, guarantee accurate dimensions, and make sure your book cover meets industry standards. But templates aren't just useful for novels—they're widely applicable to a range of print products, including comics, graphic novels, coffee table books, art and photography books, academic and educational materials, board game rule books, and children's literature. QinPrinting's fully customizable templates help you deliver an aesthetically pleasing and market-ready product while allowing you to focus more on the creative aspects of your design.
In this post we're here to guide you step-by-step through the process of using our customized book cover templates in Adobe Illustrator, which is our preferred and recommended software for this sort of thing. We'll also explain a bit more about how templates work, why they're a vital tool for most independent authors heading down the DIY route, and how they can be applied to different genres and book types. By the end of this post, you should have a solid understanding of how to use our templates to make your book cover design process more efficient, accurate, and stress-free.
Why use a book cover template?
Before we get into the step-by-step instructions, it's probably useful to explain a little more about why using a book cover template is important. But if you're already convinced, feel free to skip this part and get straight on with the instructional sections after!
Still here? Okay. Book cover templates are essentially pre-designed layouts that map out all the critical parts of your cover, including the spine, bleed areas, trim lines, and safe zones for text and images. This makes certain that your design is print-ready and reduces the risk of any errors that could lead to costly reprints or delays. Templates are particularly important when working with printers, like QinPrinting, that follow professional industry standards for book production so that your books (or other products) are of exactly the same quality as mainstream publications (because we work with mainstream publishers, too, and use the same technology for your prints as we use for theirs).
The precise guidelines embedded in the templates help you stay within acceptable margins for your book's dimensions and content placement. It takes the stress and guesswork out of the equation for first-time independent publishers.
The advantages of using cover templates extend across various types of print products:
- Comics and Graphic Novels: The artwork in these books is usually full-page and needs to be precisely aligned with the trim lines and bleeds. A template helps to guarantee that no important visual elements get accidentally cut off in printing.
- Coffee Table Books and Art Books: Often large-format and image-heavy, these books benefit from templates that accurately map the bleed areas and wrap space for hardcovers. This is especially necessary for designs that stretch across the entire cover.
- Photography Books: High-resolution images must be placed perfectly within the template to avoid quality loss during printing. The template provides clear guidance on how to position these images.
- Academic and Educational Books: These often involve complex layouts, charts, and text. Using a template guarantees that everything is positioned correctly and that the final product is both functional and visually appealing.
- Children's Books: The design of these books often incorporates playful elements that need to stay within the safe zones. A template helps guide the placement of text and illustrations, making sure nothing important gets lost in the print process.
- Board Game Rule Books: Typically, these books have a combination of images, diagrams, and text that must be laid out clearly. A template helps keep everything organized logically and easy to read and understand.

Step-by-Step Instructions for Using Book Cover Templates in Adobe Illustrator
Now that you understand the importance of using book cover templates and how they apply to different types of projects, let's go through the steps involved in actually using one in Adobe Illustrator.
1. Download the template from QinPrinting
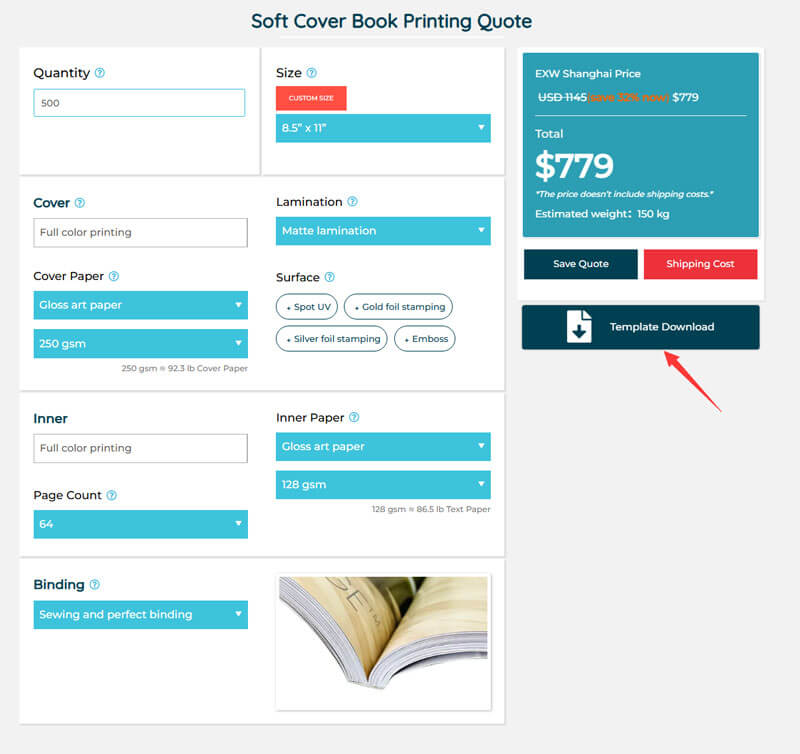
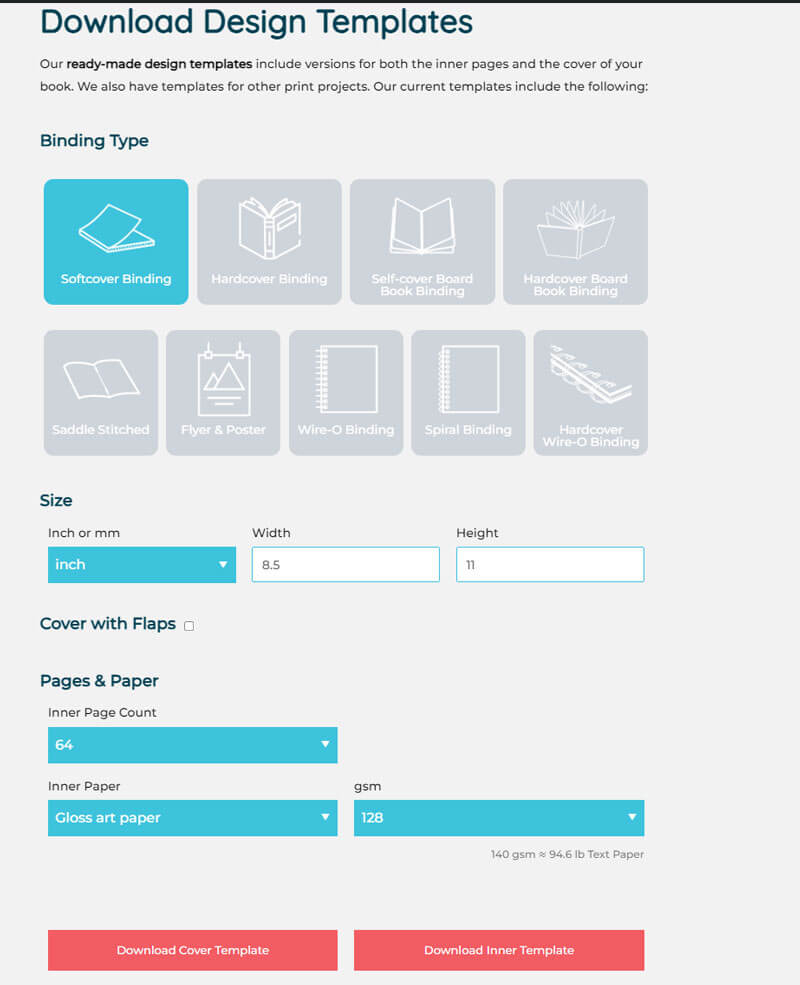
The first thing you need to do is download a customized template that fits your specific book project. QinPrinting offers a variety of templates depending on your book's binding style—softcover, hardcover, saddle stitch, etc. You can customize these templates to match the dimensions, paper choices, and other specifics of your project. Here's how you do it:
- Visit QinPrinting Templates or instant quote.
- Choose the binding style you need and click on the relevant image.
- Fill in the form with your book's dimensions, paper choices, and other necessary details.
- Download the appropriate cover template in PDF format to your computer.
2. Open the template in Adobe Illustrator
Once you've downloaded your template, open it in Adobe Illustrator. Make sure to import the PDF pages with the link option selected for optimal performance.
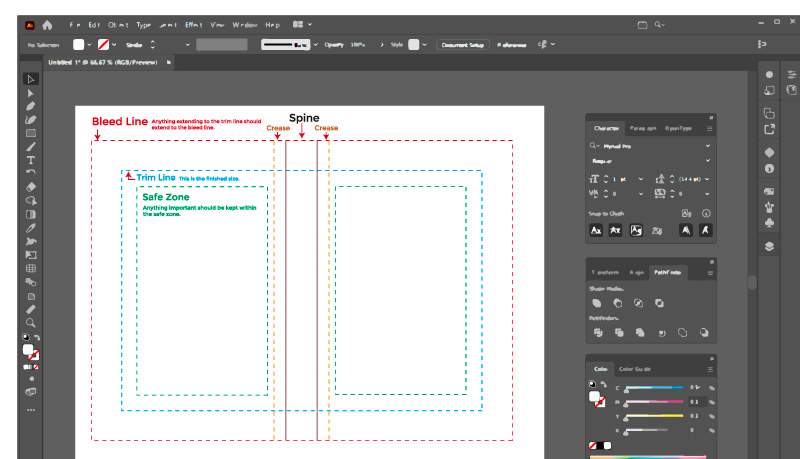
When the template opens, you'll notice the guidelines already embedded into the layout. These will include:
- Red Bleed Lines: Extending your design to these lines guarantees that your images and background colors fully cover the edges, even after trimming.
- Blue Trim Lines: These indicate where the book (or other product) will be cut during production.
- Green Safety Lines: Any text or important design elements should be within these lines to make certain that nothing is accidentally cut off.
3. Organize layers in Adobe Illustrator
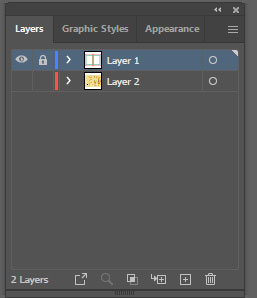
Open the Layers panel in Illustrator. You'll see that the template is already placed on one layer. Lock this layer so that you don't accidentally move or alter the template. Next, create a new layer and drag it below the template layer. All your design work will happen on this new layer, keeping your work organized and helping to guarantee that your design aligns perfectly with the template guidelines.
4. Use high-resolution images and CMYK mode
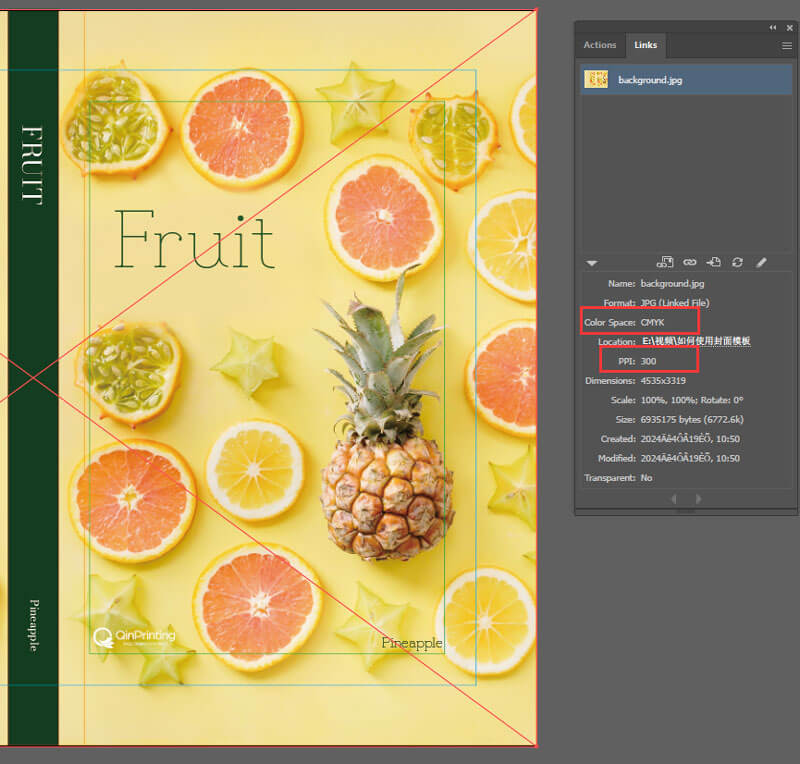
When you're designing your cover, it's important to use high-resolution images (i.e. at least 300 dpi) in CMYK color mode. This mode is the color standard used in printing, and it guarantees that your colors will appear as you want them on the final product. And don't forget to extend your background image to the red bleed lines to make certain that the design fully covers the edges of the book.
5. Insert a barcode (recommended)
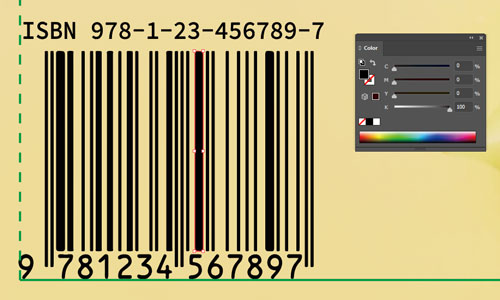
If your book will be sold in stores or online, or you want to get it into libraries or schools and colleges, for example, you'll need to include a barcode and an ISBN code. You can get the ISBN from Bowker in the US and from Nielsen in the UK (other countries have their equivalent agencies which you can find with an online search). For best results, use a vector-based barcode. This ensures that the barcode is sharp and scannable at any size, without losing quality. You can get these produced based on your ISBN, either directly from the agency or various online services.
6. Finalize and save your design
Once your design is complete, hide the layer where the template is located. This makes sure that only your artwork is visible when you save the file.
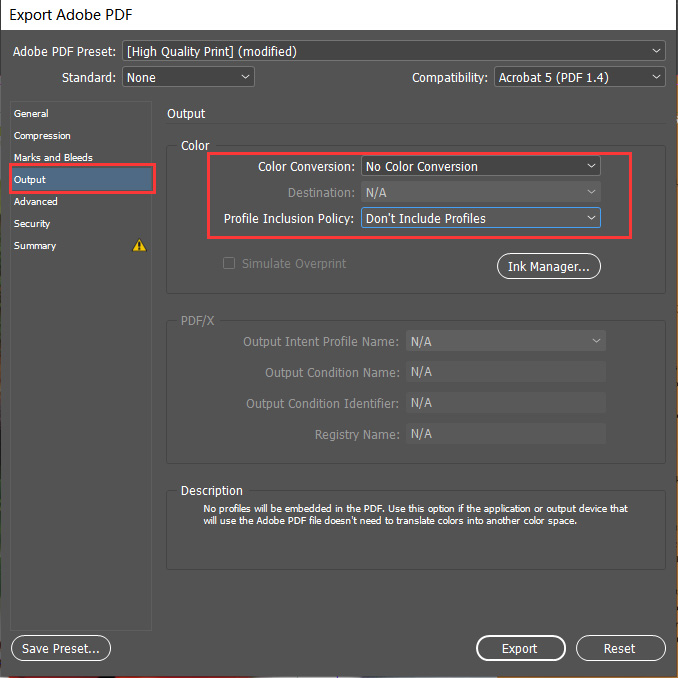
Save your work as an Adobe PDF, and in the settings panel, choose “High Quality Print” for the best results.
Under output options, select “Don't Include Profiles” to avoid embedding unnecessary color profiles that could interfere with printing.
7. Check fonts before submission
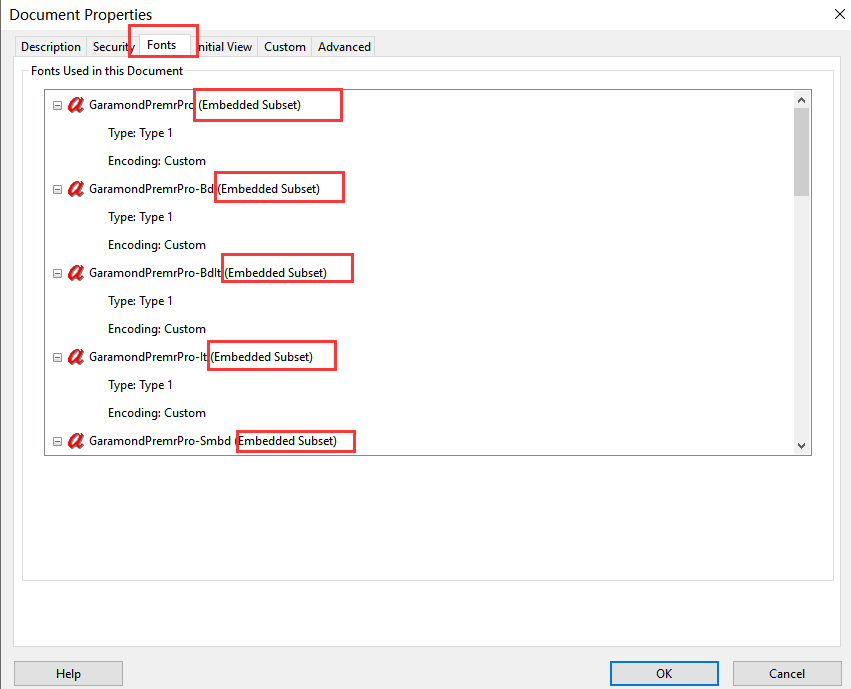
Open your saved PDF and go to File > Properties. Under the “Fonts” tab, make sure that all fonts have the “Embedded Subset” flag. This guarantees that your fonts will appear correctly on the final printed product, even if we don't have the specific fonts you've chosen installed on their system (which is unlikely, but it's better safe than sorry).
Paperback and hardback cover design notes
While the basic steps for using a template apply to all kinds of book covers, there are specific details to keep in mind depending on whether you're designing a paperback or hardback cover.
Paperback covers
For paperbacks, the width of the cover is calculated by adding the width of the front and back covers to the width of the spine. Be sure to add a bleed of 0.125 inches (3 mm) to the left edge of the back cover and the right edge of the front cover. Don't forget to add bleed to the height of the cover.
Hardback covers
Hardback covers are a bit more complex because they include an extra wrapping space, which is similar to a bleed but larger. This space is needed for the cover paper to wrap around the thick grayboard used for hardcover bindings. When designing a hardback cover, the front and back images should extend to the limits of the wrapping space to guarantee proper coverage. You also need to account for the groove space—0.39 inches (10 mm)—on either side of the spine. Double-check that any central elements of your design, such as the title or main images, don't fall over the grooves.
Talk to us. We're here to help!
Using one of our pre-made book cover templates in Adobe Illustrator allows you to design your book cover with accuracy, ease, and confidence, no matter what type of book you're creating. Whether you're designing the cover for a novel, a comic, a coffee-table book, or an academic textbook, these templates provide a structured framework that saves time and reduces errors. If you follow the steps we've given here, you can create a professional, polished cover that represents your work in the best light. With the right template and a little creativity, your book will be ready to make a strong impact in the marketplace.
If you have any further questions or run into any difficulties while using your template, don't hesitate to reach out to the QinPrinting team for help. You can contact us in a variety of ways—throught the live chat, the contact form, making a Skype appointment; but the easiest are probably either to shoot us an email to [email protected] or just call us on +1 951 866 3971 and we'll be delighted to talk things through.

