Welcome to our comprehensive Canva tutorial on creating print-ready PDF files! Canva is a versatile, user-friendly graphic design tool much used by professionals and amateurs alike. Its intuitive interface and extensive library of templates make it a popular choice for a wide range of creative projects. From book, board game, and card designers to marketers and publicists, Canva offers powerful tools that cater to diverse design needs.
Canva's core capabilities
- Ease of use: Canva’s drag-and-drop functionality and vast template library allow users to create visually appealing designs without requiring extensive design skills.
- Versatility: Suitable for various projects, including book covers, game card design, posters, and printed marketing materials.
- Collaborative features: Allows multiple users to work on the same project, making it perfect for team-based tasks.
- Accessibility: Web-based platform accessible from anywhere, with additional mobile apps for designing on the go.
Canva's main limitations
- Customization: While Canva offers extensive design options, it does not provide the same level of customization as professional software like Adobe Illustrator or InDesign (the software we use and recommend).
- Color Management: Limited support for certain professional color management required for high-end printing or specialized design tasks.
- Font management: Less robust font management compared to some professional design tools. But again, so long as your fonts are embedded in your exported PDF files, you needn’t worry about this for now.
Whether you’re designing book covers, board game components, marketing materials, or publicity campaigns, and you want to use an intuitive, free web tool for your designs, understanding how to create print-ready files using Canva may be a very good idea. In this tutorial we will guide you through the process, making sure that your final product meets our high professional printing standards. By mastering these skills, you can avoid common pitfalls and help guarantee that your designs look polished and professional in print.
Let’s get started!
Getting started with Canva
Opening Canva
To begin, you’ll need to access Canva!
- Open your web browser and go to Canva. Canva is a web-based platform, so there’s no need to download any software.
- If you already have a Canva account, log in with your credentials. If you’re new to Canva, you’ll need to sign up. Canva offers free and paid subscription plans, with the Pro version providing additional features and resources. But you can probably do everything you need with the free version unless your project is especially unusual or complex and strict about color.
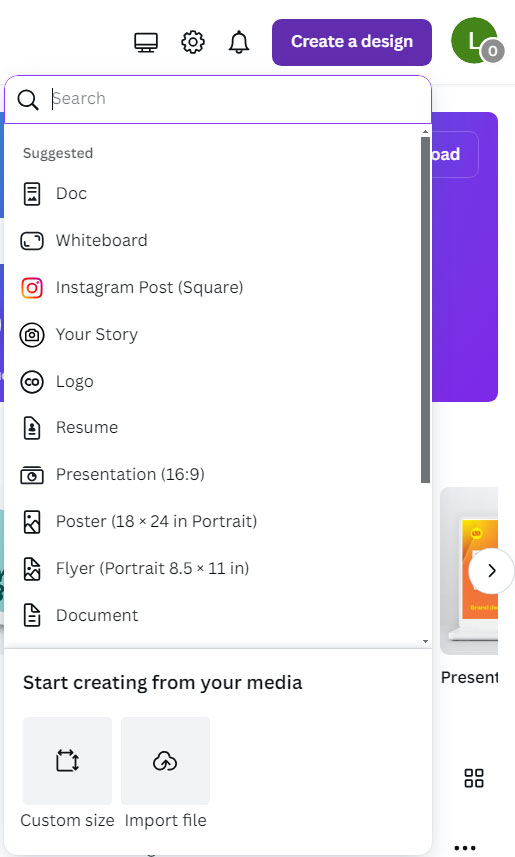
Creating a new design
Once you’re logged in, the next step is to create a new design.
- Click on “Create a design”. This button is usually located in the top right corner of the Canva homepage but its exact location may depend on your browser and device.. Clicking it will open a drop-down menu with various design options.
- Choose a template or custom size. You can either choose a pre-made template from Canva’s extensive library or create a custom design based on your specific needs. For print projects, custom dimensions are often necessary to match the industry standard requirements of your project.
Enter desired dimensions
When creating a custom design, specifying the correct dimensions is critical to getting it right.
- A dialog box will prompt you to enter the width and height of your design. Make sure to measure in the units that are most appropriate for your project (inches or millimeters are typically used for print materials).
- Next to the dimension fields, there’s a drop-down menu where you can select the units (pixels, inches, millimeters, or centimeters). If you’re working with us, please choose inches or millimeters.
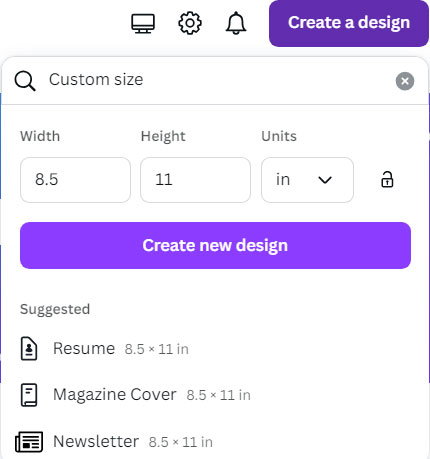
Examples for different designers
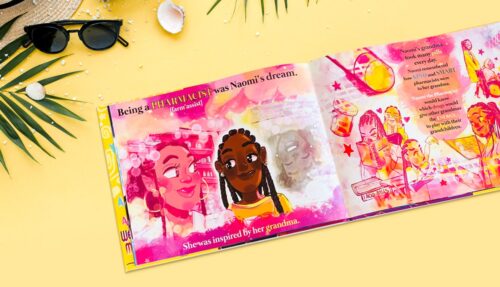
- Book designers: For book covers, you might enter dimensions such as 6 x 9 inches for a standard trade paperback, considering the spine width if designing a full cover.
- Board game designers: If designing game boards or cards, you might enter dimensions like 2.5 x 3.5 inches for standard playing cards.
- Marketers and publicists: For flyers or posters, common sizes include 8.5 x 11 inches for flyers or 18 x 24 inches for posters.
By setting the right dimensions from the start, you make sure that your design will fit perfectly within the intended print specifications, preventing issues with scaling and resolution later on.
With your custom canvas set up, you’re now ready to move on to the next steps in creating a professional, print-ready design.
Setting up for print design
Enable print bleed settings
To make sure your design prints correctly, it’s essential to set up your file with bleed.
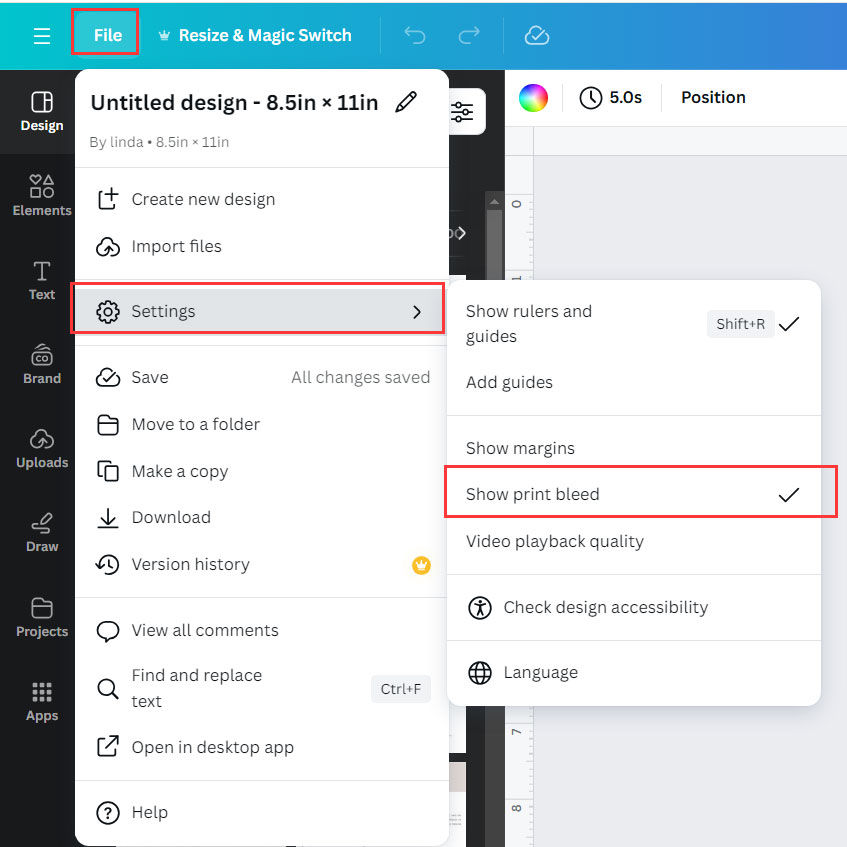
- On the top left corner of the Canva workspace, you’ll find the “File” option. Click on it to open a drop-down menu.
- Within the drop-down menu, select “Settings”. This will open a settings panel where you can adjust various options related to your design.
- Look for the option labeled “Show print bleed” and check the box next to it. This will add a bleed area around your canvas, marked by dashed lines. The bleed area allows that your design extends slightly beyond the actual trim size, preventing any white edges from appearing after trimming.
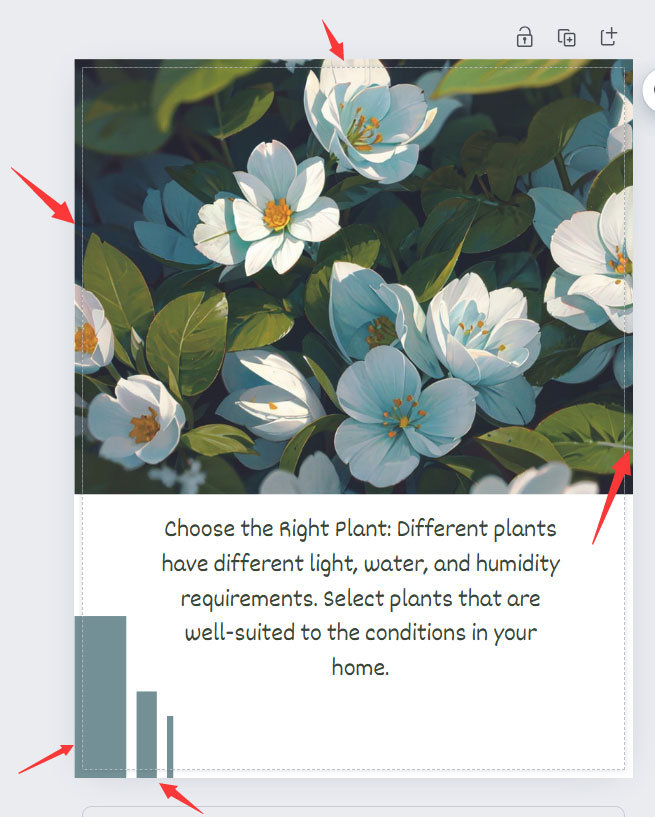
Understanding trim lines and bleed area
It’s important to understand the concepts of trim lines and bleed area to make sure your design prints as intended.
- Trim lines: The dashed lines you see on the canvas represent the trim lines. This is where we will cut your printed design to the final size. Anything outside these lines will be trimmed off.
- Bleed area: The area beyond the trim lines is known as the bleed. It usually extends 0.125 inches (3 mm) beyond the trim lines. This extra space ensures that there are no unprinted edges when the design is cut to size. It’s especially important for designs with backgrounds or images that extend to the edge of the page.

Why bleed matters
Understanding why bleed is so vitally important can help you prepare a professional printed product.
- Prevents white borders: Without bleed, minor cutting misalignments — which are inevitable even in the most finely calibrated mechanical printing process — could result in white borders around the edges of your printed piece. The bleed area helps avoid this by ensuring that the background or images extend slightly beyond the trim lines.
- Professional standards: Most professional printers require a bleed to enable them to produce high-quality prints. Including bleed in your design aligns with industry standards and means your work will be print-ready for any professional printing service, including our own.
Now that your design canvas is correctly set up for printing, you can proceed with confidence to the creative part of the process, knowing that your final product will meet professional printing standards.
Design your artwork
With your canvas set up correctly, you can now start designing your artwork. Follow these guidelines to make sure your design is both visually appealing and print-ready.
Start your design
Begin by adding elements to your canvas.
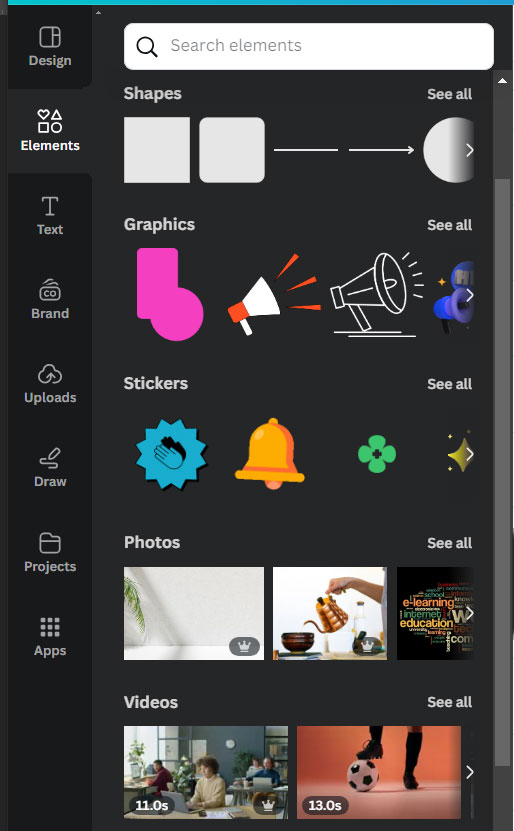
- Use Canva’s extensive library to add elements such as shapes, icons, and illustrations. You can find these by clicking on the “Elements” tab on the left-hand side of the screen. You can also upload them from your computer.
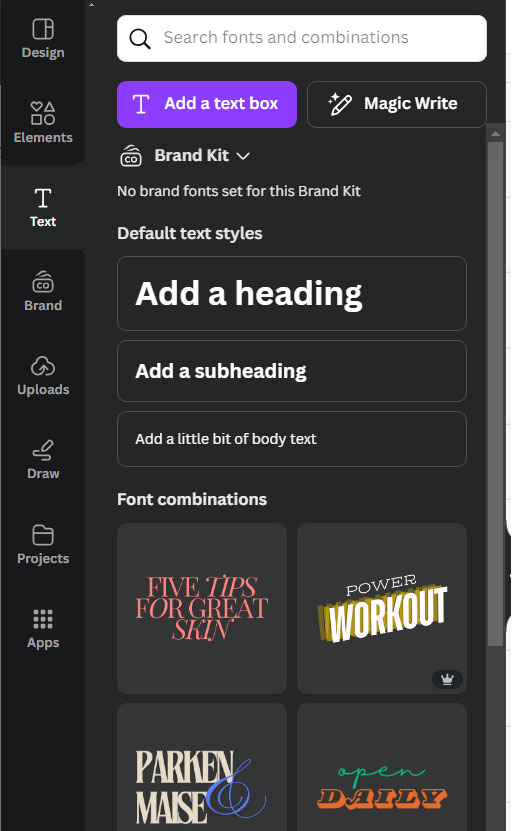
- Add text to your design by selecting the “Text” tab. Canva offers a variety of fonts and text styles to choose from. Make sure your text is clear and readable.
High-resolution images
High-resolution images are essential for clear, professional-looking prints.
- All images should be 300 dpi (dots per inch). This resolution makes sure that images print sharply without pixelation.
Extending background to bleed area
We know we keep banging on about trim lines and bleed areas but it’s one of the issues we come across so often and that some customers without previous design experience have trouble with. So, we want to help. To avoid any unwanted white borders, extend your background to the full extent of the bleed area! Thank you.
- Book designers: For a book cover, make sure the cover design extends into the bleed area to prevent any white lines along the edges. This includes the background color or images that should cover the entire front, back, and spine without interruption.
- Board game designers: For game cards, boards, tokens, or any component with a printed surface, extend any background patterns or images to the bleed area. This ensures that when the cards are cut, there are no white edges.
- Marketers and publicists: For posters or flyers, extend any full-page images or background colors into the bleed area to maintain a clean edge after trimming.
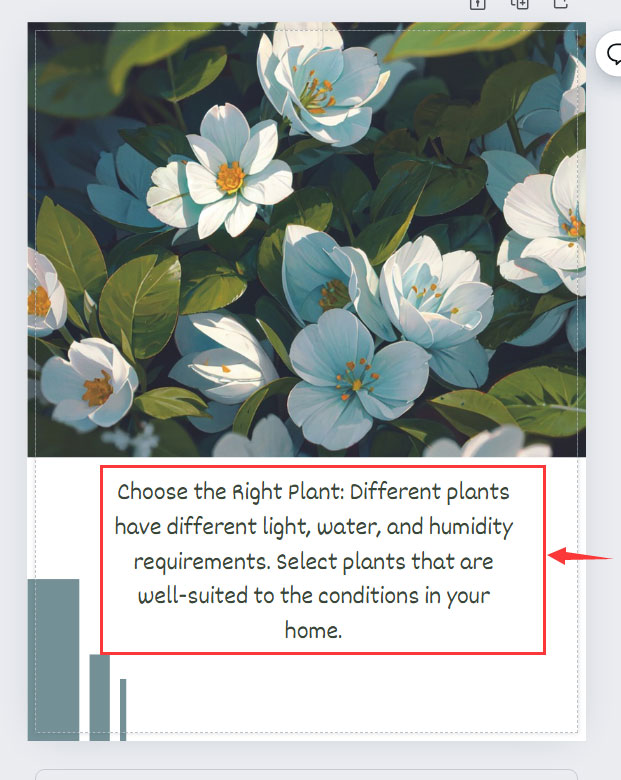
Keeping important content within safe margins
Protect important design elements from being trimmed off.
- Keep all crucial content, such as text and key images, at least 0.125 inches (3 mm) inside the trim lines. This is known as the “safe area”.
- Align text and important elements well within these margins to make sure they remain intact after cutting.
By following these guidelines, you can create a visually appealing and professionally designed print-ready file in Canva. Paying attention to these details helps us make sure that your final product will look great when printed, with no unexpected issues or errors.
With your design complete and properly formatted, you’re ready to move on to finalizing and exporting your design for print.
Finalizing your design for print
Once your design is complete, the final steps are to download it in the correct format and make sure all settings are properly configured for printing. This ensures that your design will be printed accurately and professionally.
Downloading your design
Begin the process of exporting your design from Canva.
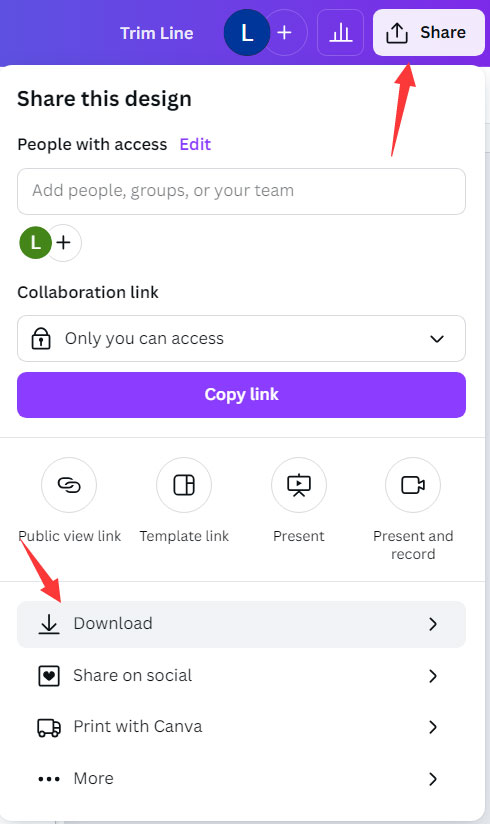
- In the top right corner of the Canva interface, you’ll find the “Share” button. Click on it to open a drop-down menu.
- From the drop-down menu, select the “Download” option. This will open the download settings panel where you can choose the file format and adjust other settings.
Choose the correct download options
Make sure your design is saved in the correct format for print.
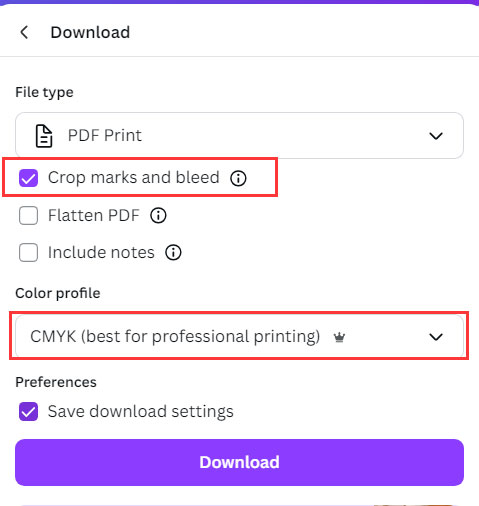
- Select “PDF Print” from the file type options. This format is specifically designed for high-quality printing, preserving the detail and resolution of your design.
- Check “Crop Marks” and “Bleed”:
- Bleed: Make sure the “Bleed” option is checked to include the bleed area in your PDF. This guarantees that any design elements extending beyond the trim lines are included in the final file.
- Color: Make sure that the color profile is set to CMYK. This ensures that the colors in your design will be printed correctly, matching the intended shades and tones.
Click on "Download"
After setting all the options correctly, you can download your file.
- Click the “Download” button. Canva will generate a print-ready PDF file and save it to your computer.
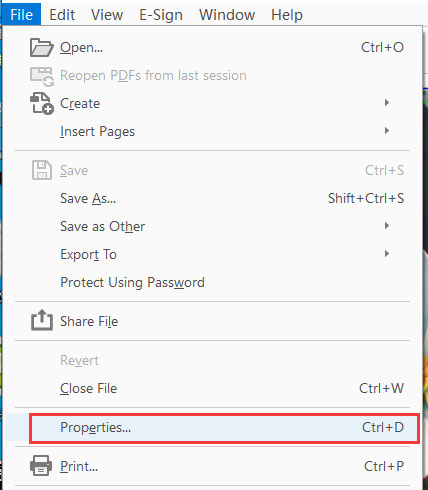
Check the PDF properties
Before sending your file to us for printing, verify the PDF properties to make sure everything is correctly set
Use a PDF reader to open the file you’ve just downloaded. Adobe Acrobat Reader is a commonly used tool for this purpose.
Check the document size including the bleed area by viewing the document properties. The dimensions should match the intended size plus the bleed.
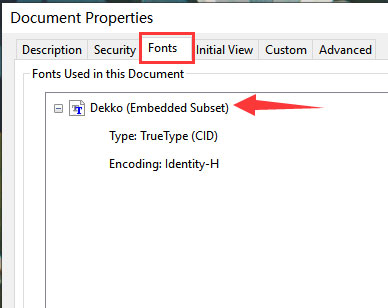
Checking that fonts are embedded correctly prevents font substitution issues.
- In your PDF reader, go to the “File” menu.
- Select “Properties” to view details about your file.
- In the document properties, check the fonts section to see that all fonts are embedded.
- Make sure each font shows the “Embedded Subset” flag. This means that the exact fonts used in your design are included in the PDF, avoiding any changes or substitutions when printed.
By carefully following these steps, you can be confident that your design is properly formatted and ready for print. This attention to detail helps prevent common printing issues and guarantees a professional final product.
Canva's Free PDF Page Remover
If you need to remove unwanted pages from a PDF, Adobe Acrobat is a popular choice, but Canva offers a free alternative worth trying. With Canva’s PDF editor, you can delete pages, make simple edits, and even convert your file—all in one place. Simply upload, select, and get a new PDF without extra content.
Final Review
Before finalizing your print order, take a moment to review the entire document.
- Proofread: Double-check all text for spelling and grammatical errors.
- Visual check: Make sure that all design elements are properly aligned and within the safe margins.
- Color consistency: Verify that colors look correct and consistent throughout the document.
Now that your project is correctly formatted and thoroughly checked, it’s ready to go to print. Congratulations on completing your print-ready design in Canva!
Talk to us!
QinPrinting is a world leader in professional-level offset printing services for both corporate and private clients around the globe. Our global reputation for excellence is built on detailed knowledge and experience within the industry, state-of-the-art printing equipment at our facilities in the famous city of Shanghai, unbeatable prices, rigorous quality controls, and genuine dedication to personalized customer care. We created this guide—with video, text, and screenshots—to make your life as easy as possible when it comes to designing your printed materials. But if you have any questions still, please get in touch. We’re here to help!